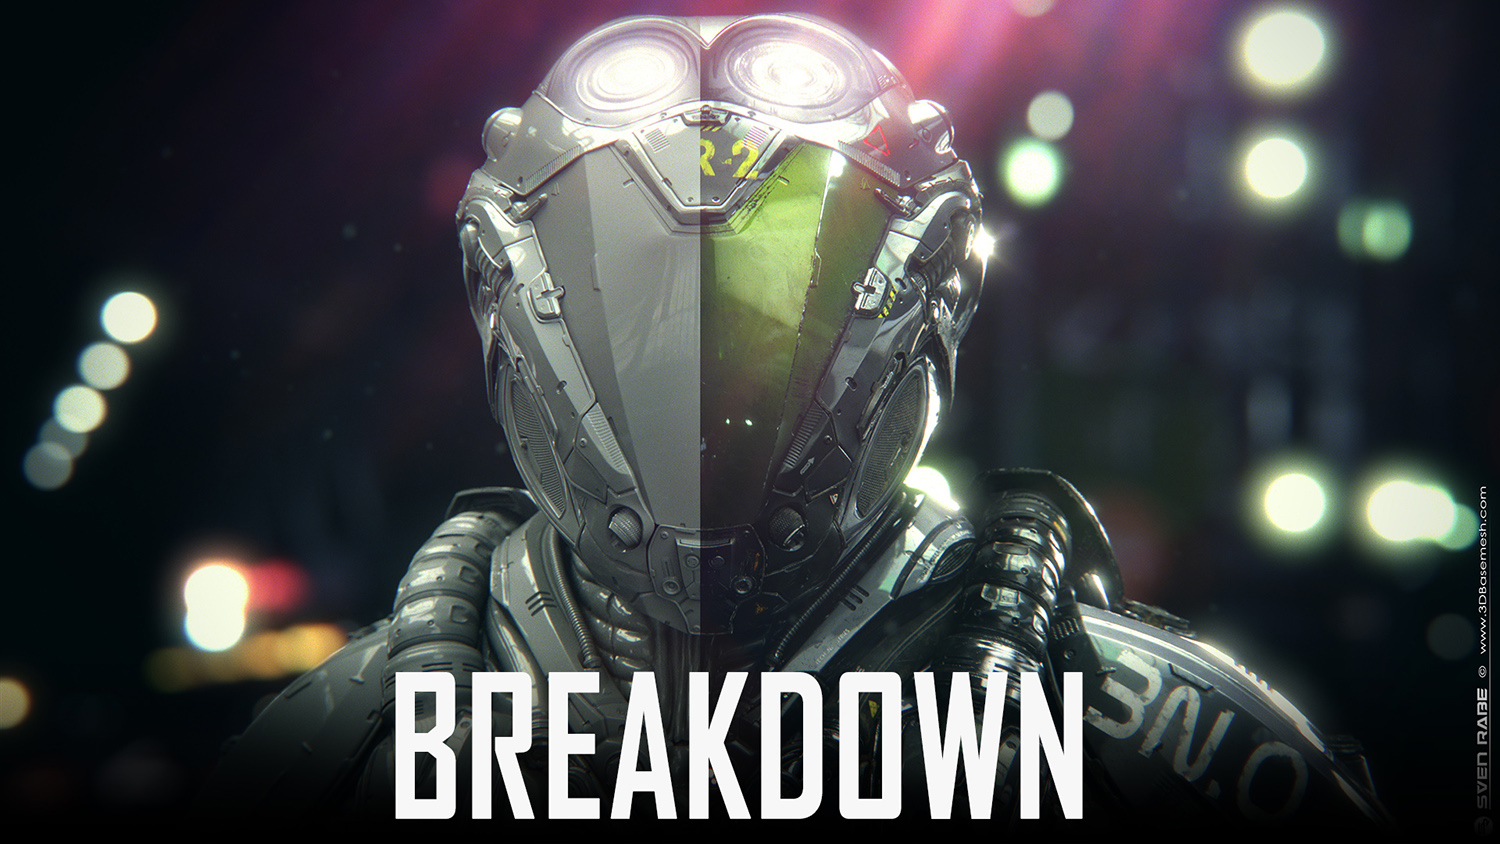
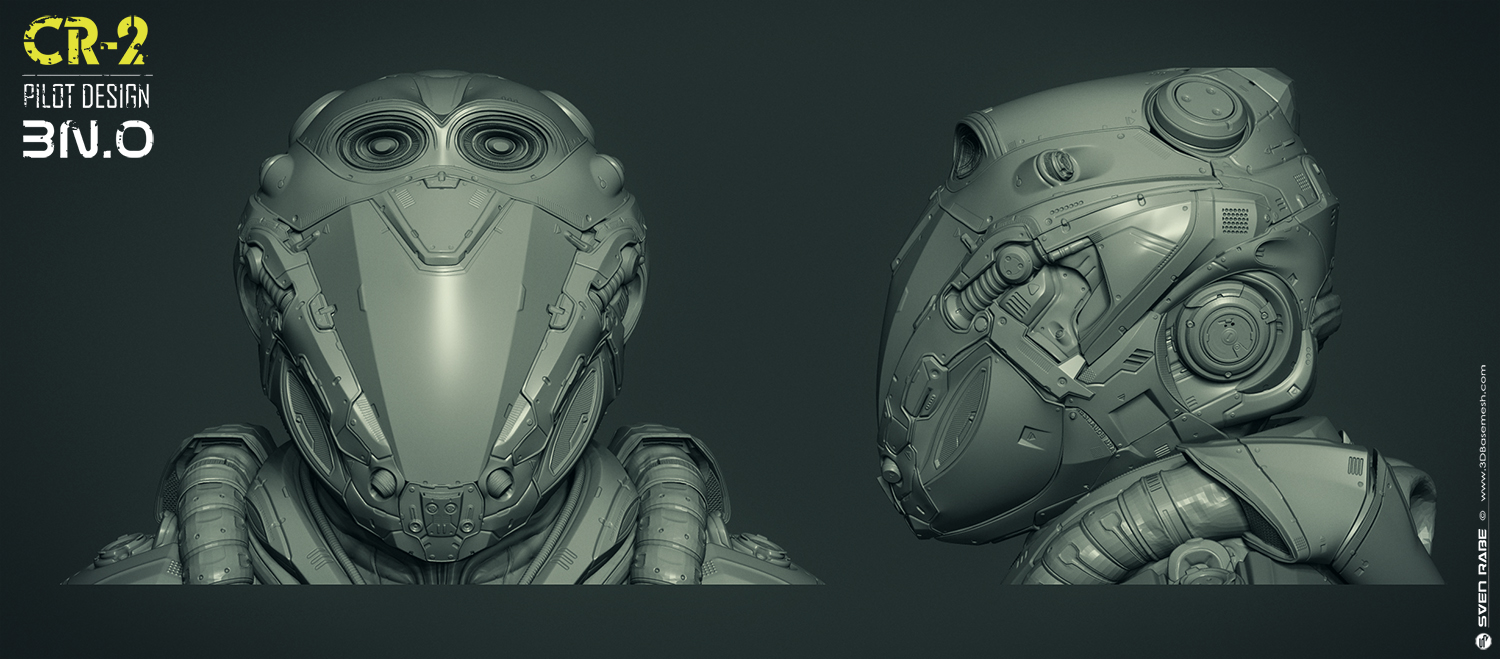
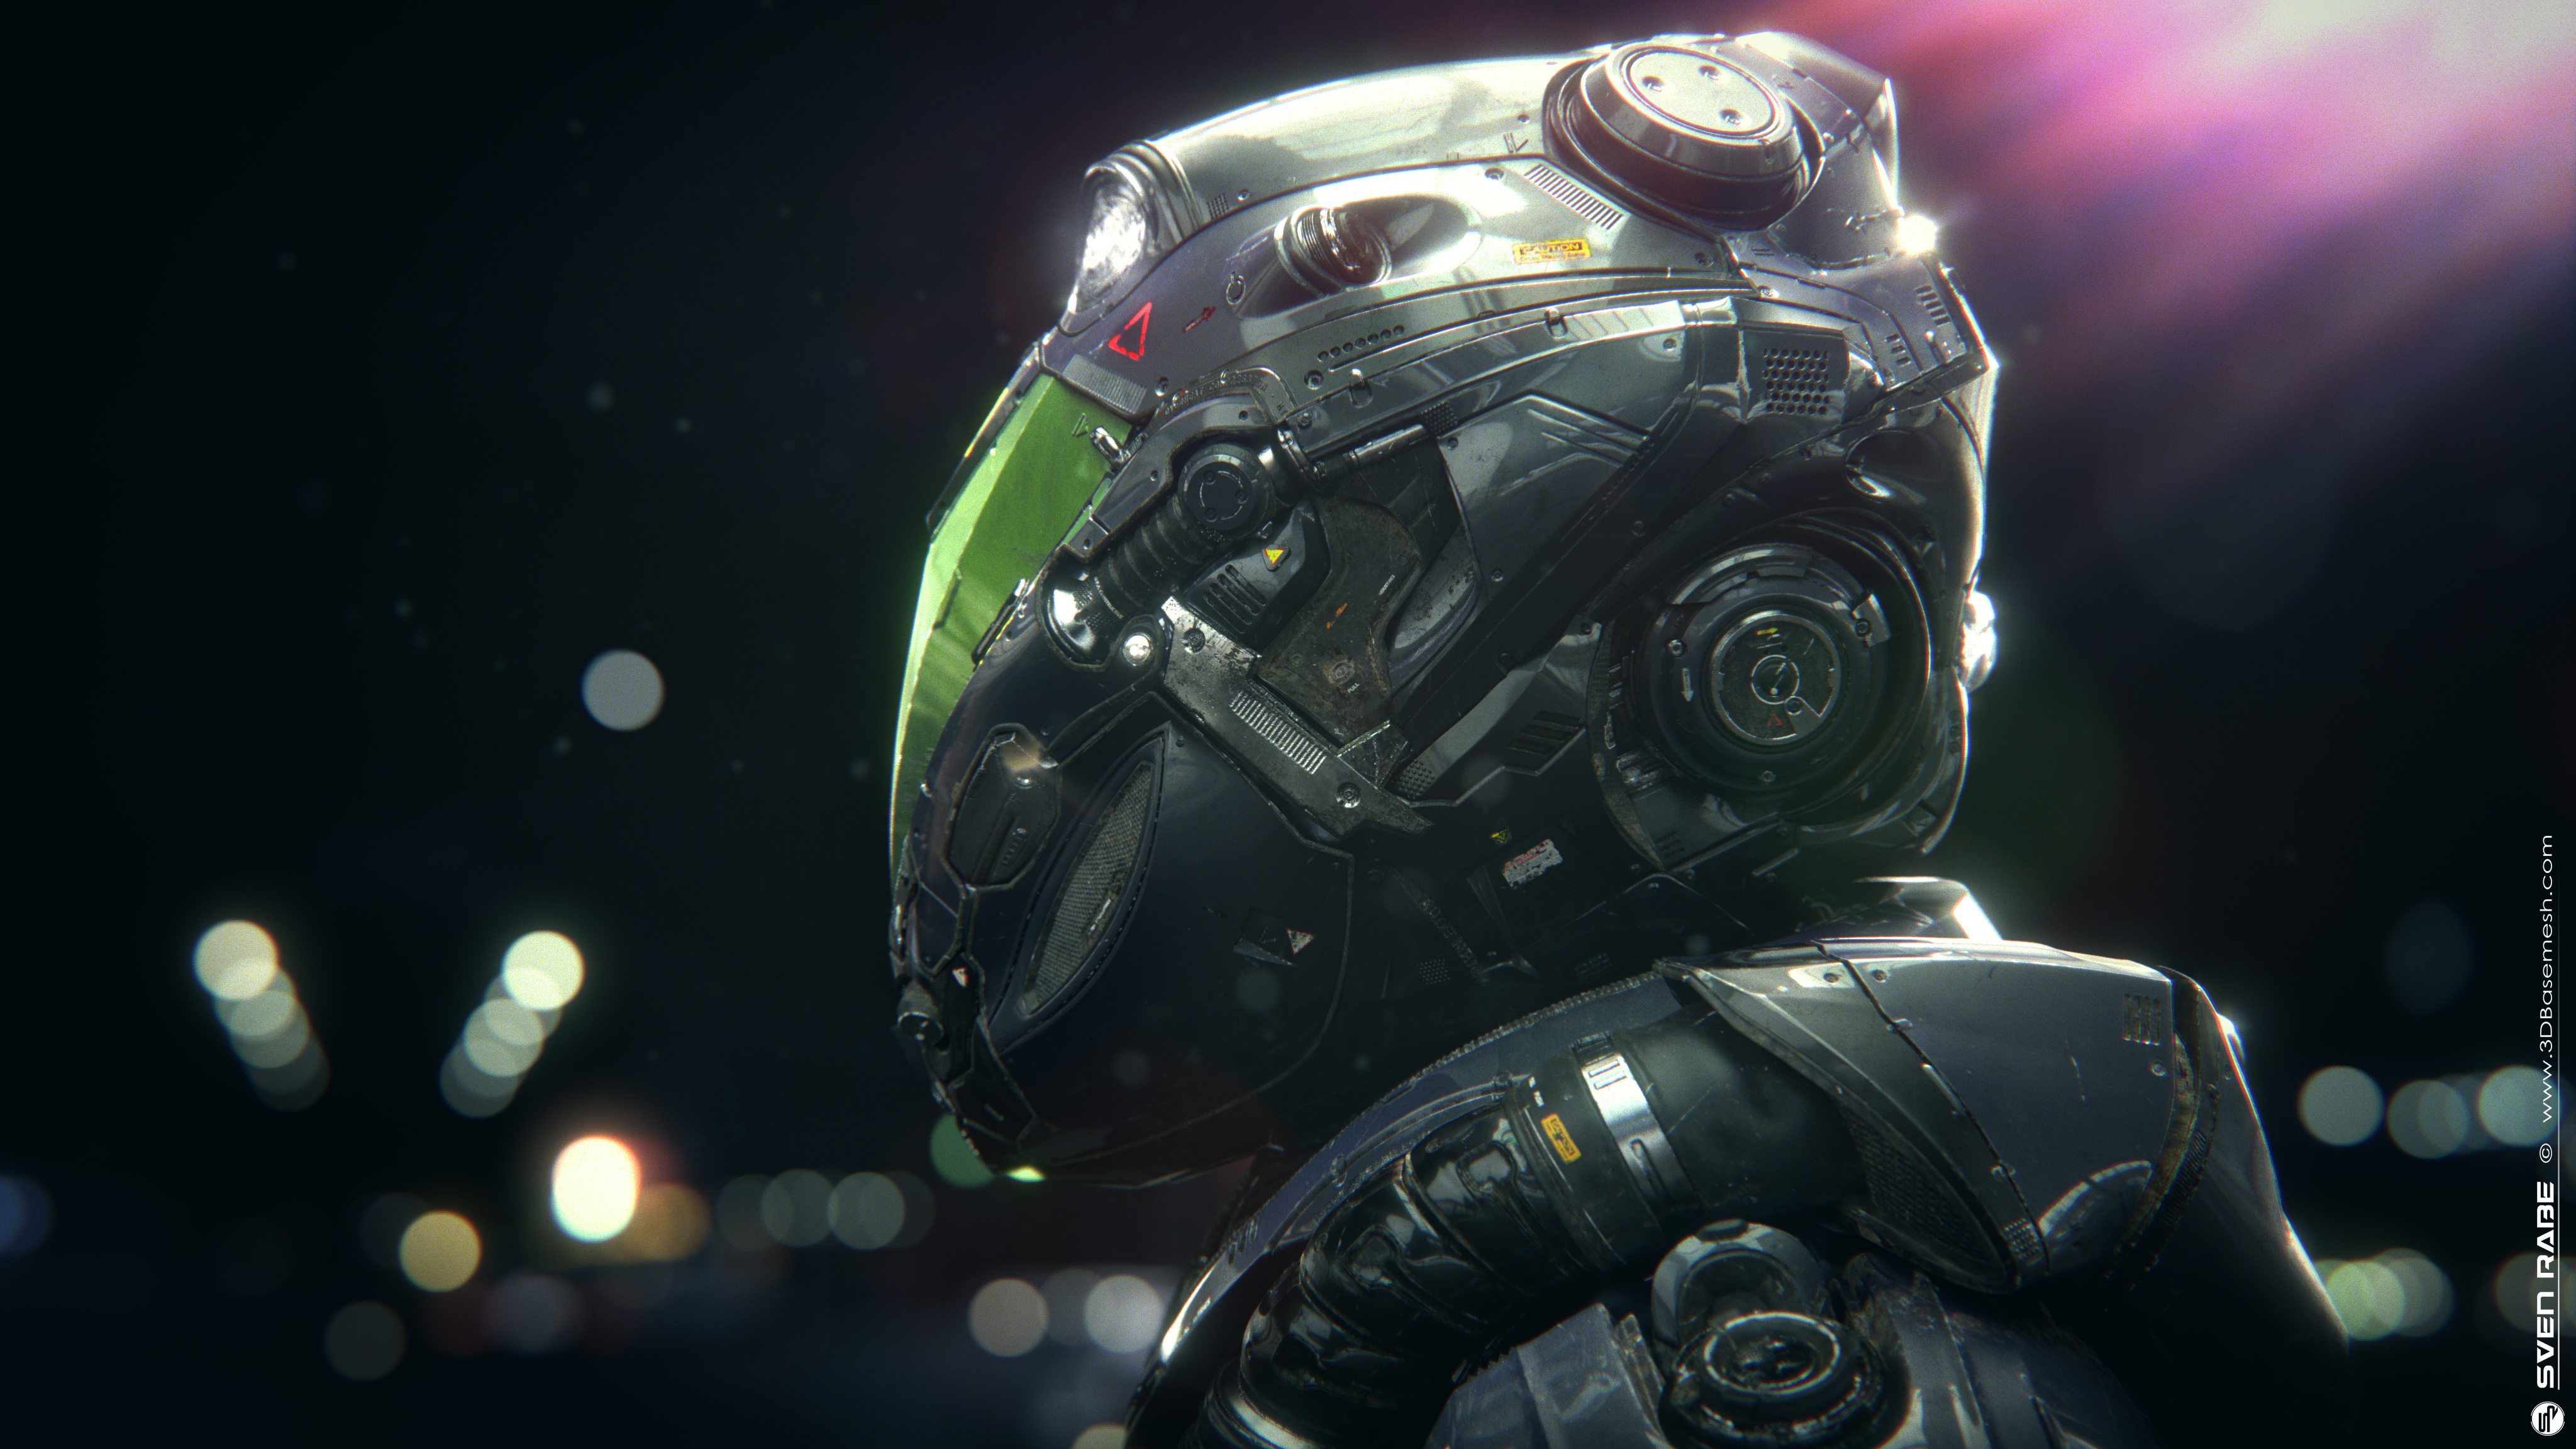
Hi everybody, in this breakdown I will briefly go through the creation process of my latest artwork, the ‘CR-2 Pilot Design’. You will get an round-up of all the main stages from the initial idea of the concept, all the way to the final composition. I hope you enjoy and you might find some of it useful for one of your next projects. OK, let’s jump right into it…
SOFTWARE
Maya | Arnold | Mari | ZBrush | Nuke | Photoshop
The idea
So basically everything starts with an idea right? On a personal project like this, it is really helpful to have a basic idea of what you’re going for, as it gives you a certain direction and a specific goal you’re trying to accomplish. It also prevents you from getting lost in endless possibilities, which could lead you to a point where you might loose interest in your work and probably never gonna finish it, especially on longer-range projects. For the CR-2, my idea was to create a sci-fi pilot suit with some sort of hangar or airbase environment and all should take place at a nightly mood.
Creating Moodboards
Usually the next step for me is to get some more inspiration and gather as much references as possible to create ‘Moodboards’ for every aspect of the project. A great little helper software here is ‘PureRef’. Check it out, you’re gonna like it. Material wise I wanted the main elements of the pilot to be a coated kind of car paint shader, so I needed to assure to get nice reflections and highlights from the environment. Below you see an example of one of my moodboards which I mainly used for getting an idea of the look and feel of the environment and the overall lighting and color theme.
Example moodboard for the environment and overal color theme
Concept Phase
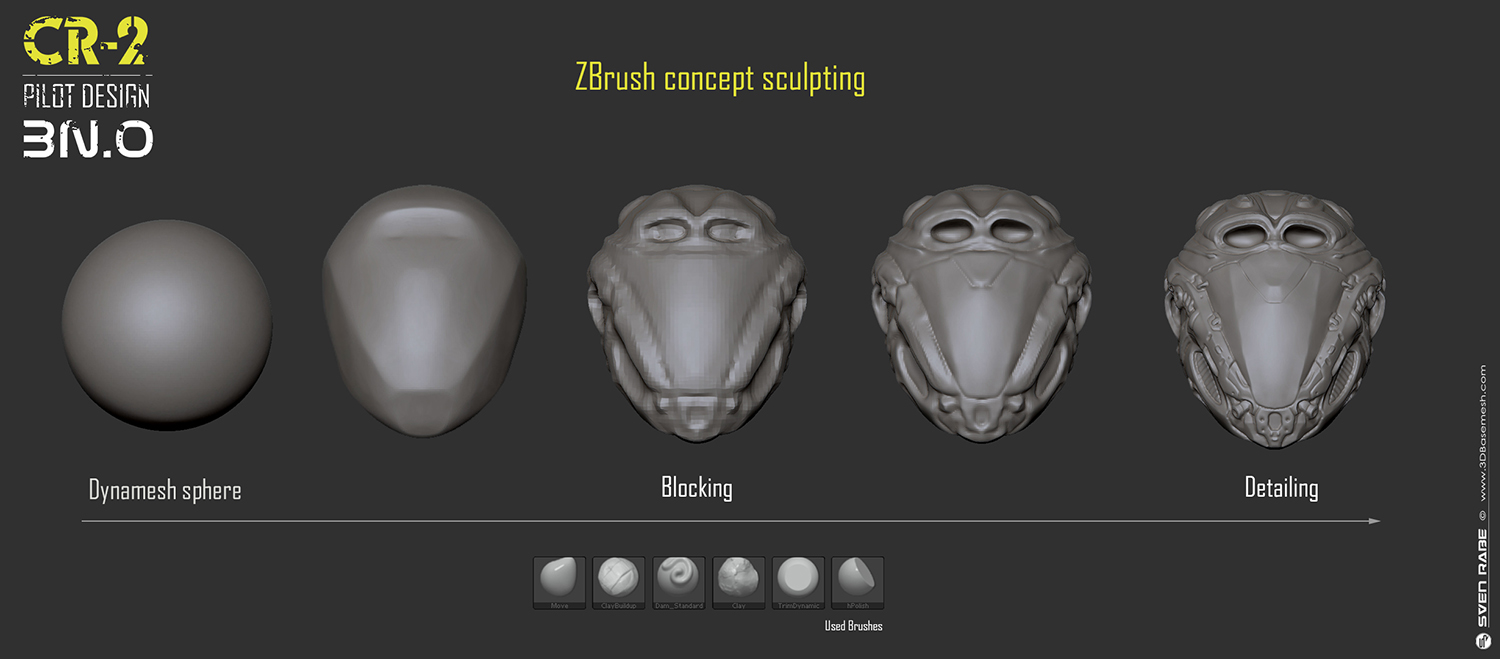
At this stage I’m trying to find a suitable shape language for the design by using various worklfows. Depending on the project I mostly start sketching directly in 3D with ZBrush and sometimes I do some quick 2D overpaint in Photshop to add some more details or to try out different ideas. I always start with basic shapes and large planes, because these elements are usually creating a curtain rhythm of a design. Purpose is also really important so I always try to think of, what is the function of every element. Simultaneously I often do check silhouettes with a constant black material, so I can get an impression of the overall shape and how it reads. When it comes to detailing, I try to not overdo it, very often less is more. Give the eyes of the viewer areas to rest while looking at your design. I know detailing in ZBrush is a lot of fun and very quick and easy to do, at least for concept modeling, but as much as complexity helps to recreate reality, it still needs some kind of balance to make it really authentic. Also this pilot suit is based on human proportions, therefor I used a 3D head scan as a reference, so a real head would fit into the helmet, which helps to make it more believable.
ZBrush concept sculpting progress
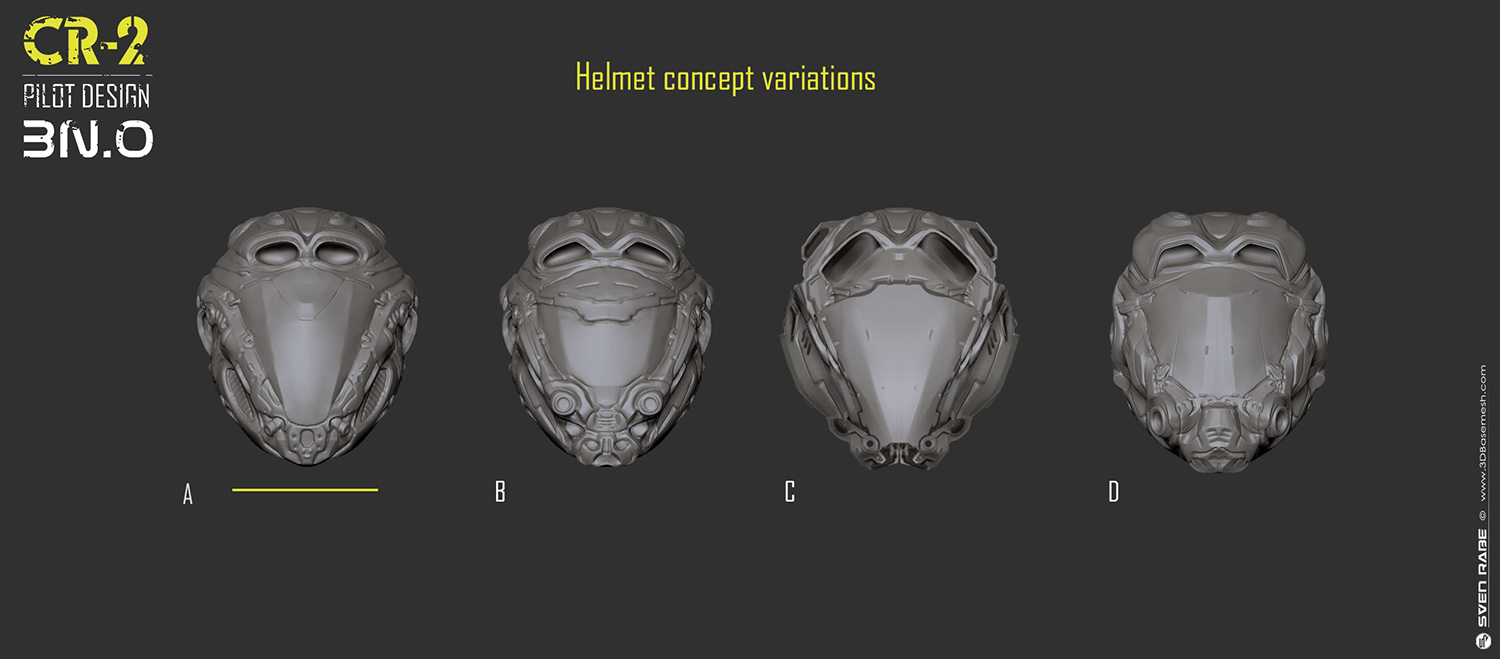
After finishing the first concept, I started creating some quick variations to try out different ideas. Depending on my time I usually try to create 3-5 versions. Here I also use ZBrush in combination with Photoshop overpaints. In the end I sticked to the original concept, as I liked the clear overall shape of it.
Quick helmet concept variations, done with ZBrush and Photoshop
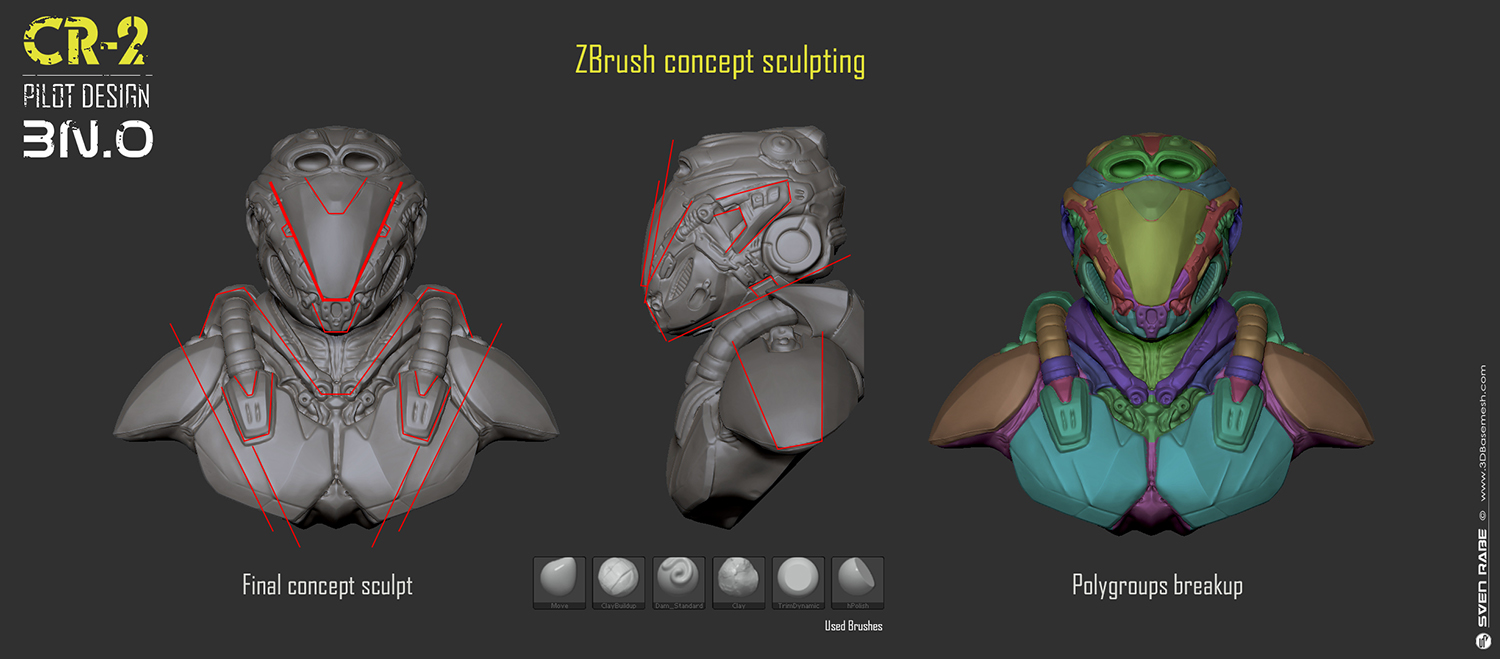
The last stage of the concept phase was to translate the design of the helmet to the rest of the model, so everything fits together. As I really liked the V-shape of the visor, which is very prominent in the concept, I wanted to assure that this shape language reads across the whole model. In the next step I then started to break up everything into multiple pieces, which makes it a lot easier to work on and to finalize it. This was mainly done with the polygroups feature in ZBrush, where I sometimes simply paint a mask and convert it to a polygroup (CTRL + W) or I just extract the mask to create a new subtool. Don’t forget to name your elements properly and try to organize yourself, as it can get messy really quick and in the end you’ll waist a lot of time with searching and cleaning things up. During the process I usually break up shapes more and more, but for the beginning, it’s good to focus on the main shapes. Below you can see the final concept with some guidelines and the first rough polygroups breakup:
Final concept sculpt and polygroups breakup
Final Modeling
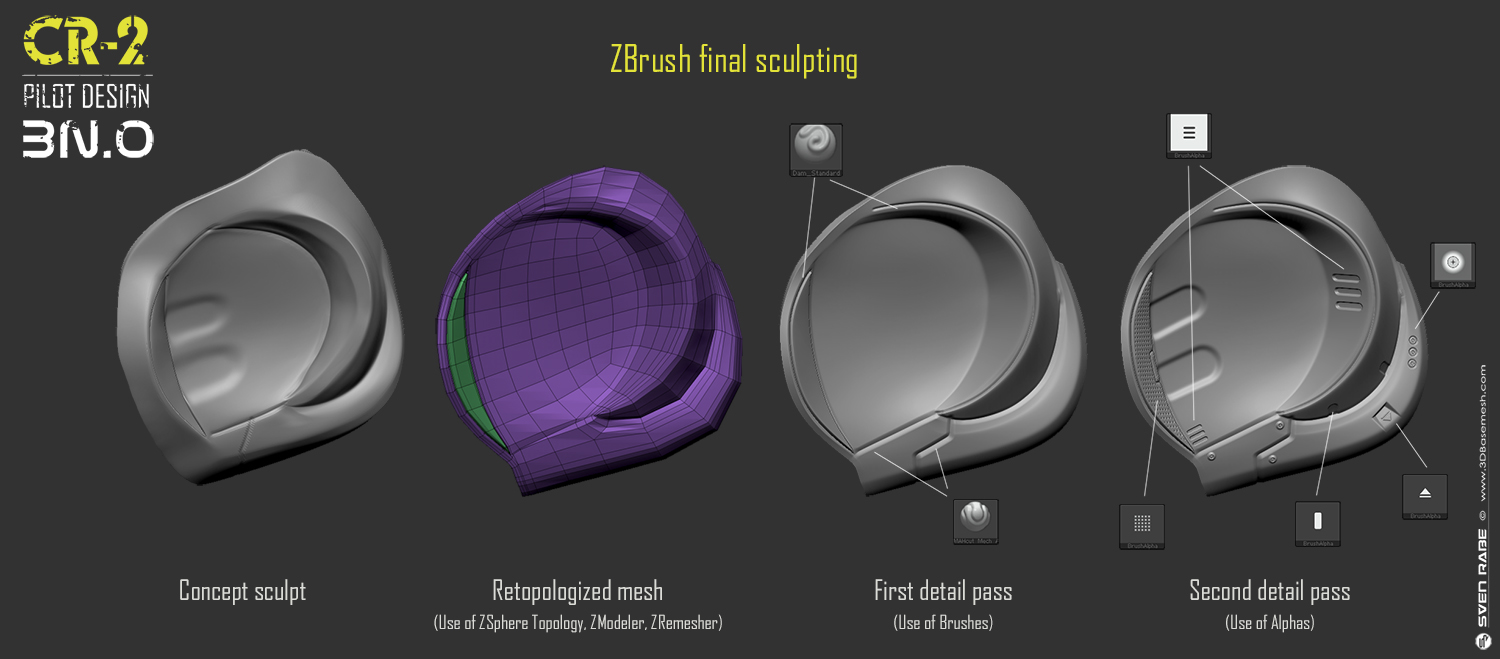
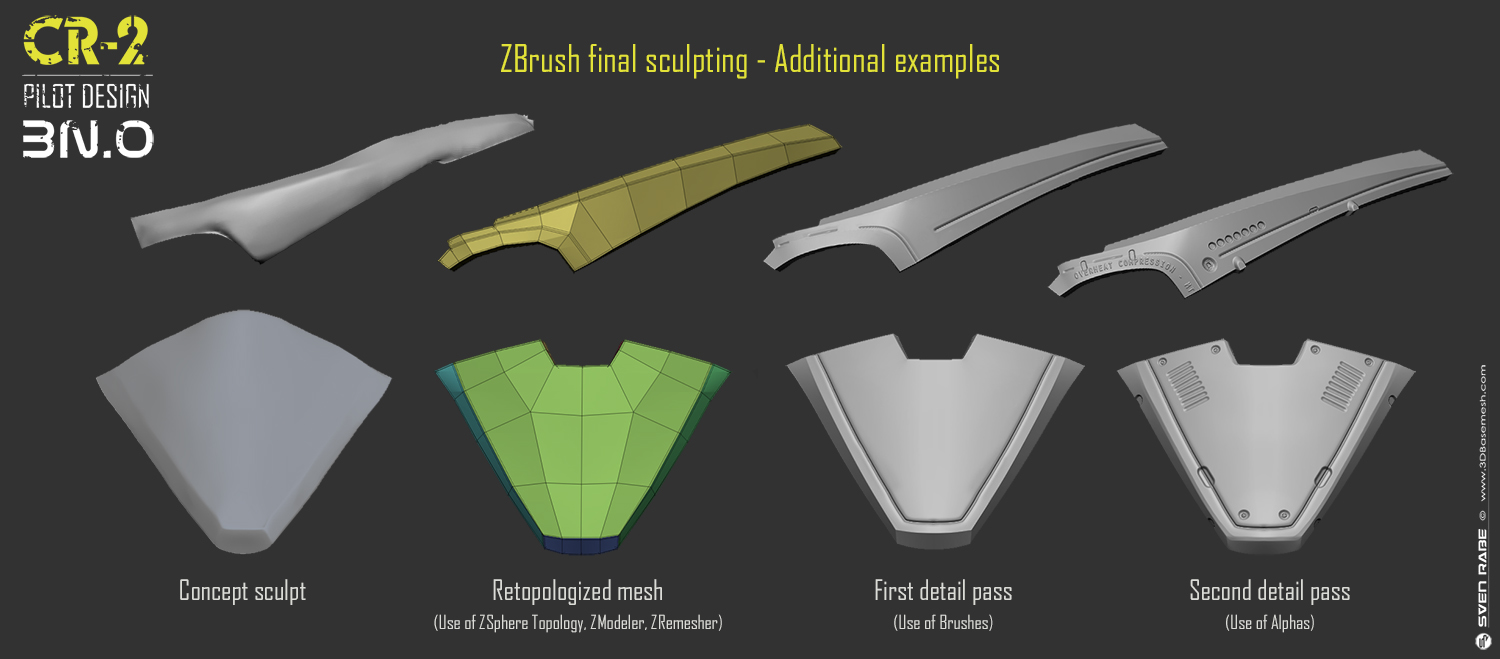
To create clean shapes I retopologized each of the concept parts by using various workflows in ZBrush, like ZSphere Topology, ZModeler or ZRemesher. For some parts I also just did some quick retopo in Maya. Now with a clean basemesh I subdivided a couple of times and started to add some detail layers on top. I created these details with various brushes and alphas. Some of them I’ve found online, so credits goes to the guys who made them, be sure to check them out: Mike Jensen, Tom Newbury, Michael Angelo Hernandez and Michael Pavlovich. Of course there are a lot of different ways to do all this and the various techniques are evolving constantly, but I hope you get the idea.
Progress of the final ZBrush modeling
Additional examples
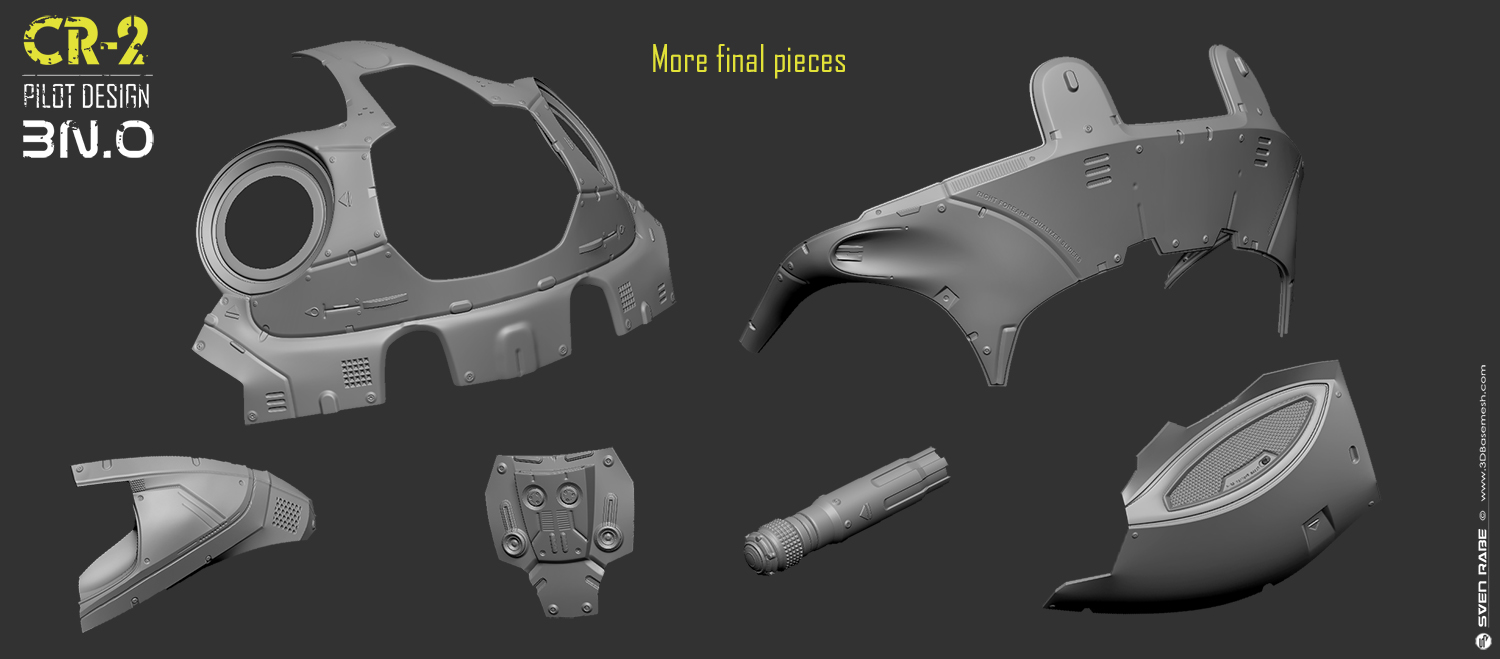
Some final model parts
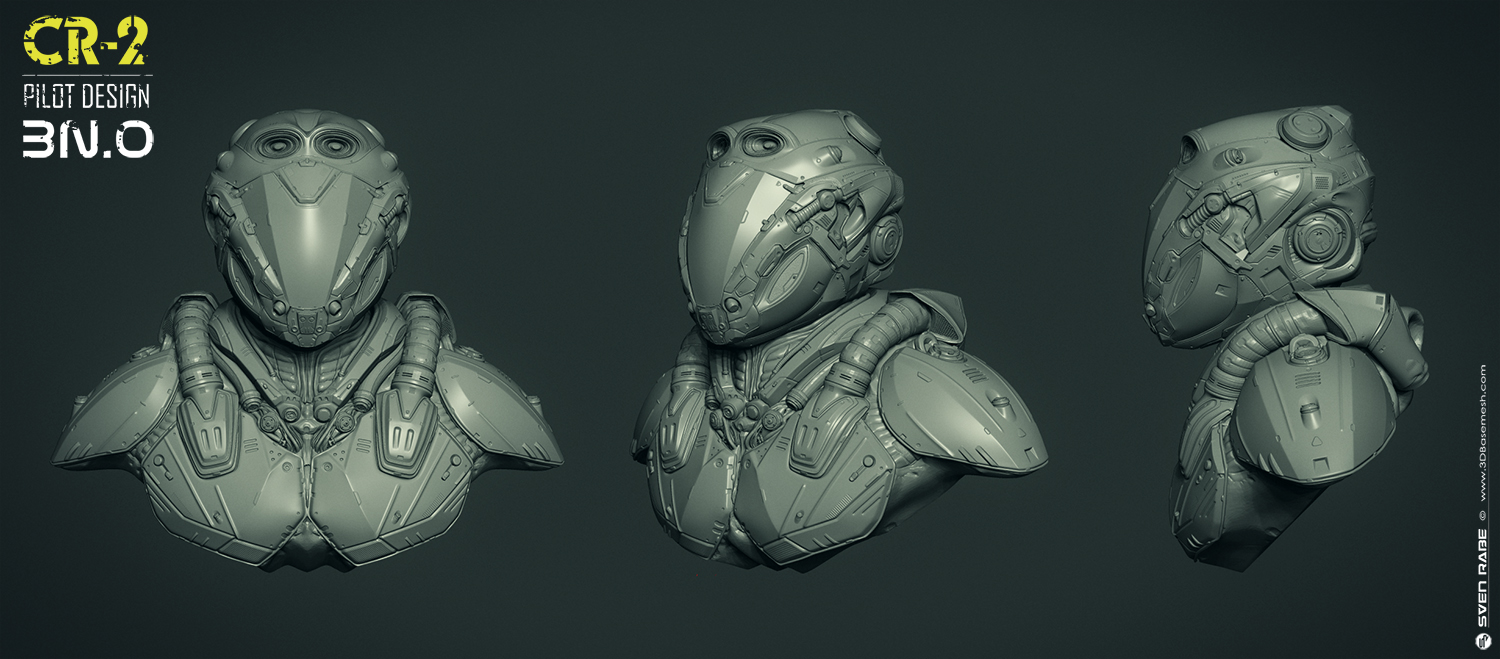
The final model when all parts are assembled
Final model – Close-up
Model optimization
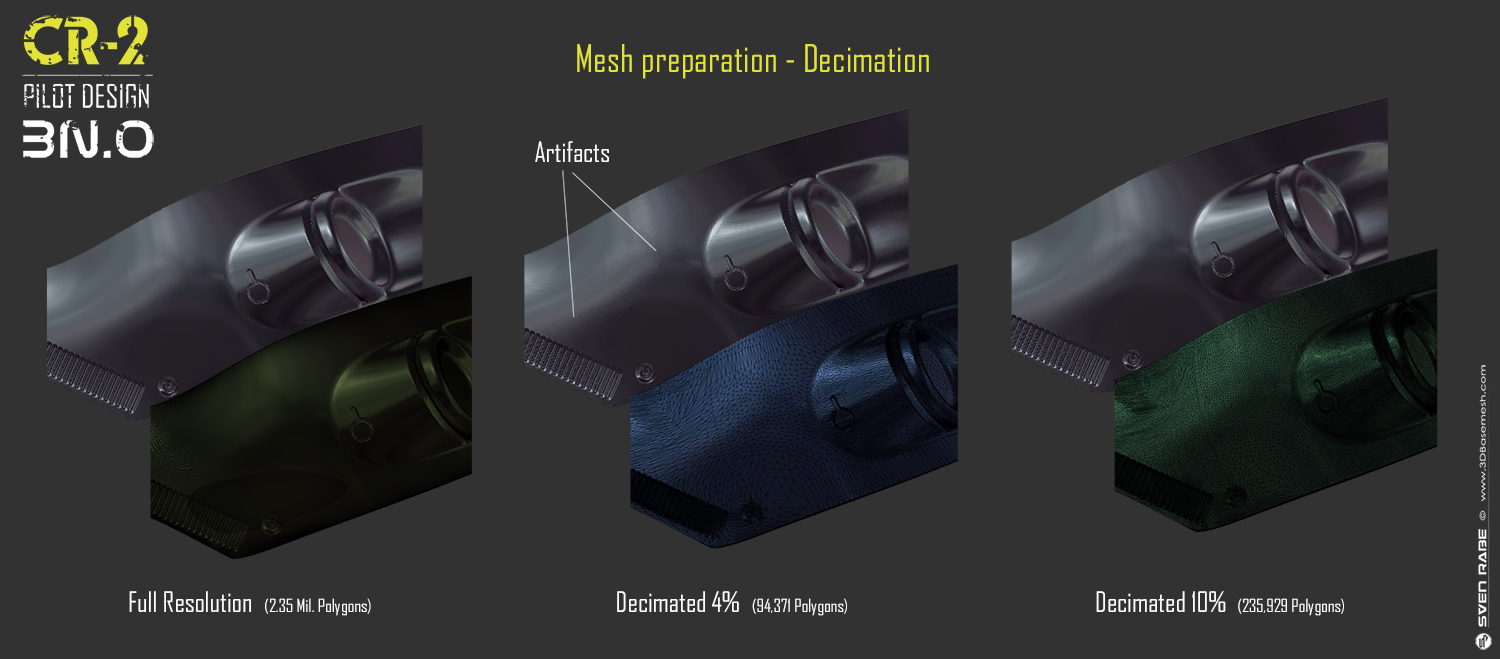
If this would be a hero production asset for a vfx or advertising pipeline, I usually would have to remodel everything in clean smoothable subdivision surfaces, including most of the small details. But as this is a personal project, I’m doing a sort of ‘concept modelling workflow’ here and skip the clean topology step to save some time. In production I usually would get a concept art and depending on the project, I might would have started directly in Maya to model it, so I would quickly end up with a clean topology mesh. Here I’m currently dealing with very high resolution meshes, so what I did is, I decimated each object in ZBrush with the Decimation Master plugin. As I knew, I’m going to render the pilot close up in 4K, I needed to assure that the meshes are light enough to work with in Maya and MARI, but without getting artifacts in the surface when rendering. Usually, if your material isn’t too glossy and you render a long shot for example (full figure), those artifacts wouldn’t be too obvious, so you could decimate the mesh much more, but in my case, I ended up with relatively high resolution meshes, as you can see on the example below:
Mesh optimization with Decimation Master in ZBrush
Material layout and UV’s
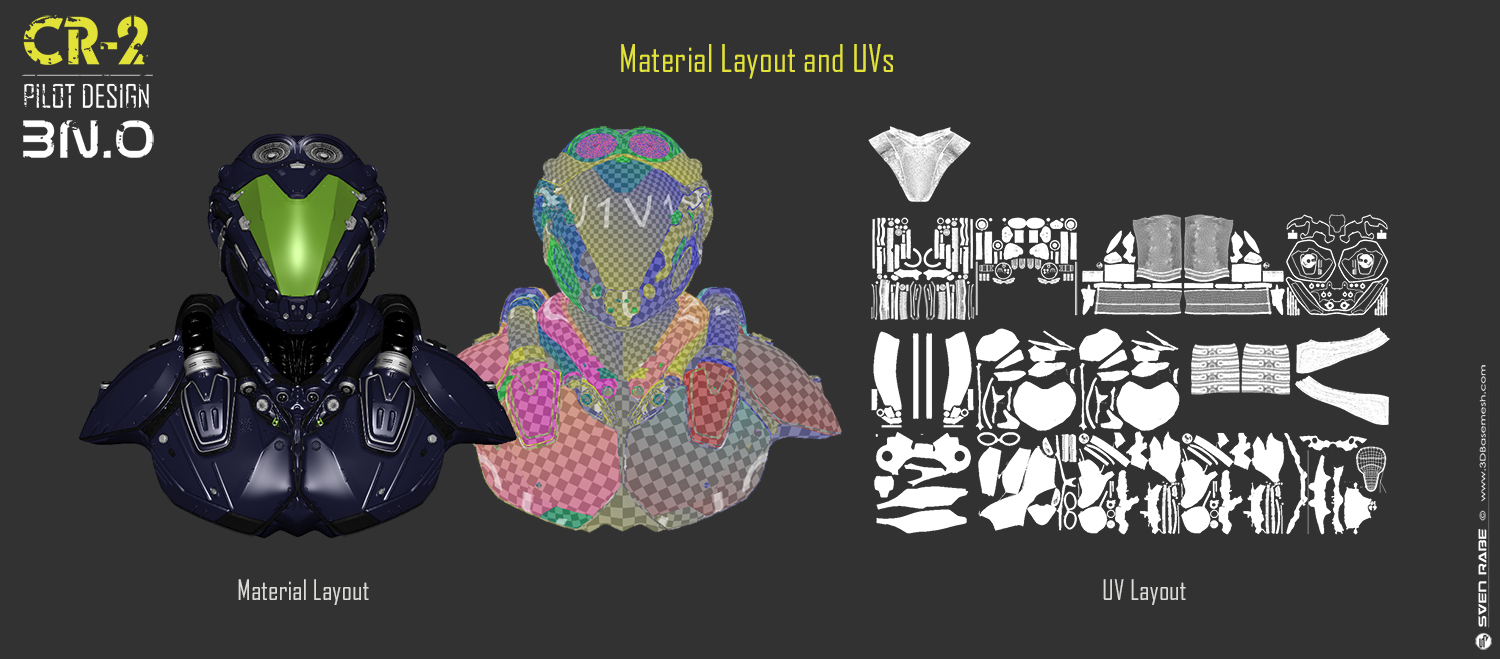
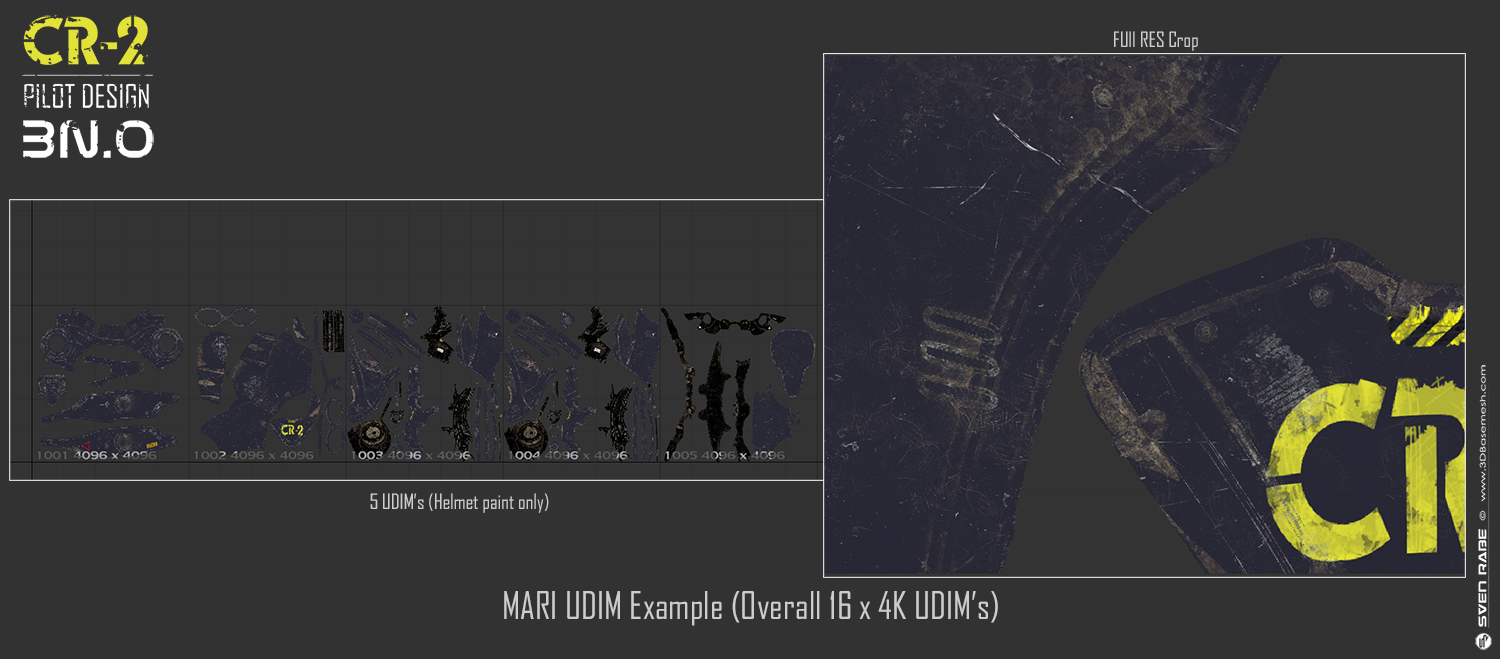
Before starting the uv’s, I did a quick material layout in maya to see how many different materials I will need and which parts will be sharing the same material. For the CR-2 I used bascially 5 materials: metal, paint (coating), rubber, plastic (carbon) and glass, which I also used as a guide for organizing the UDIM’s for MARI. To lay out uv’s, I mostly use a combination of Maya’s uv tools and Headus UV Layout, depending on the object. As MARI got some great symmetry tools, I always try to keep my uv’s symmetrical as much as possible. On this project I ended up with 16 x 4K UDIM’s, as my machine couldn’t handle more, but generally spoken for film or advertising work your texture resolution should be double the output resolution of the individual piece. Be sure to keep the ratio of all uv’s relatively equal, unless you want certain parts different in resolution, like for example very small parts like rivets. The last step here was to merge all objects according to their material assignment, so I had only 5 objects to work with in MARI.
Maya material layout and UV setup
Texturing in MARI
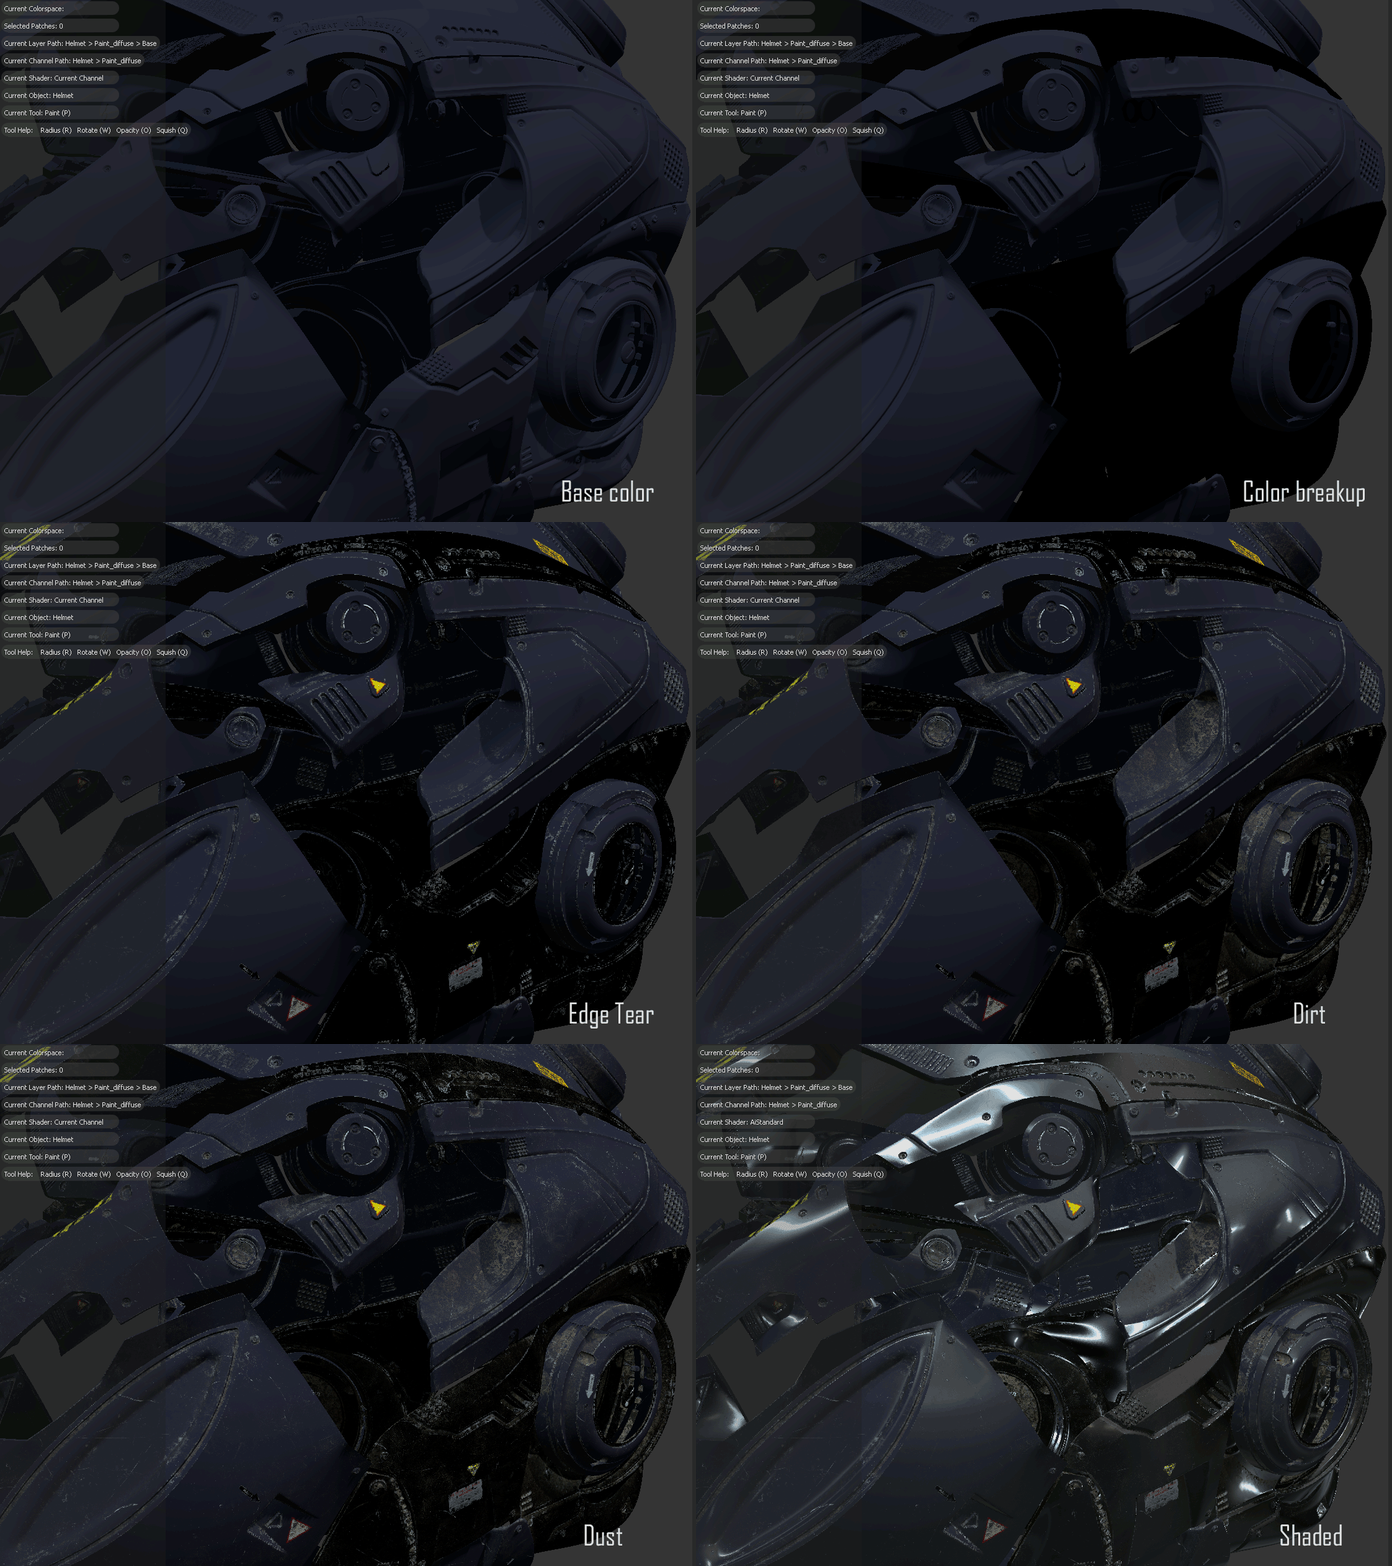
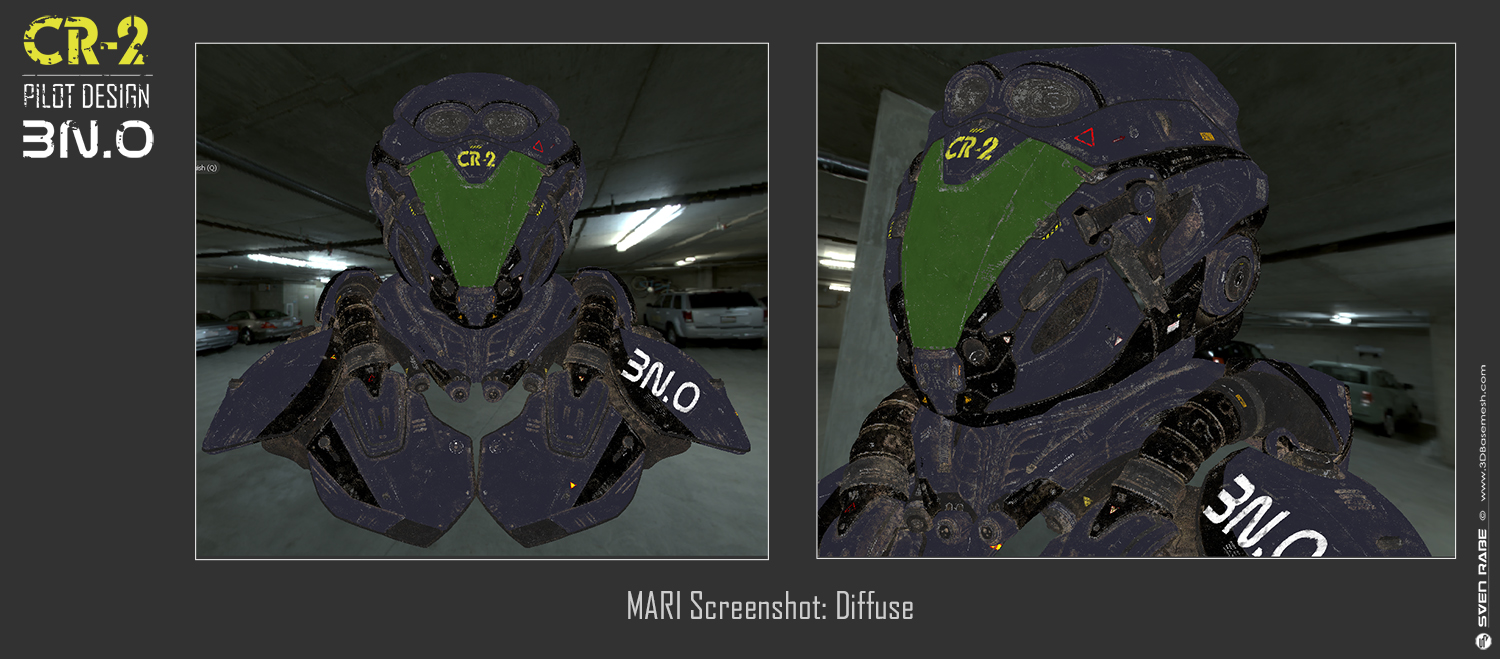
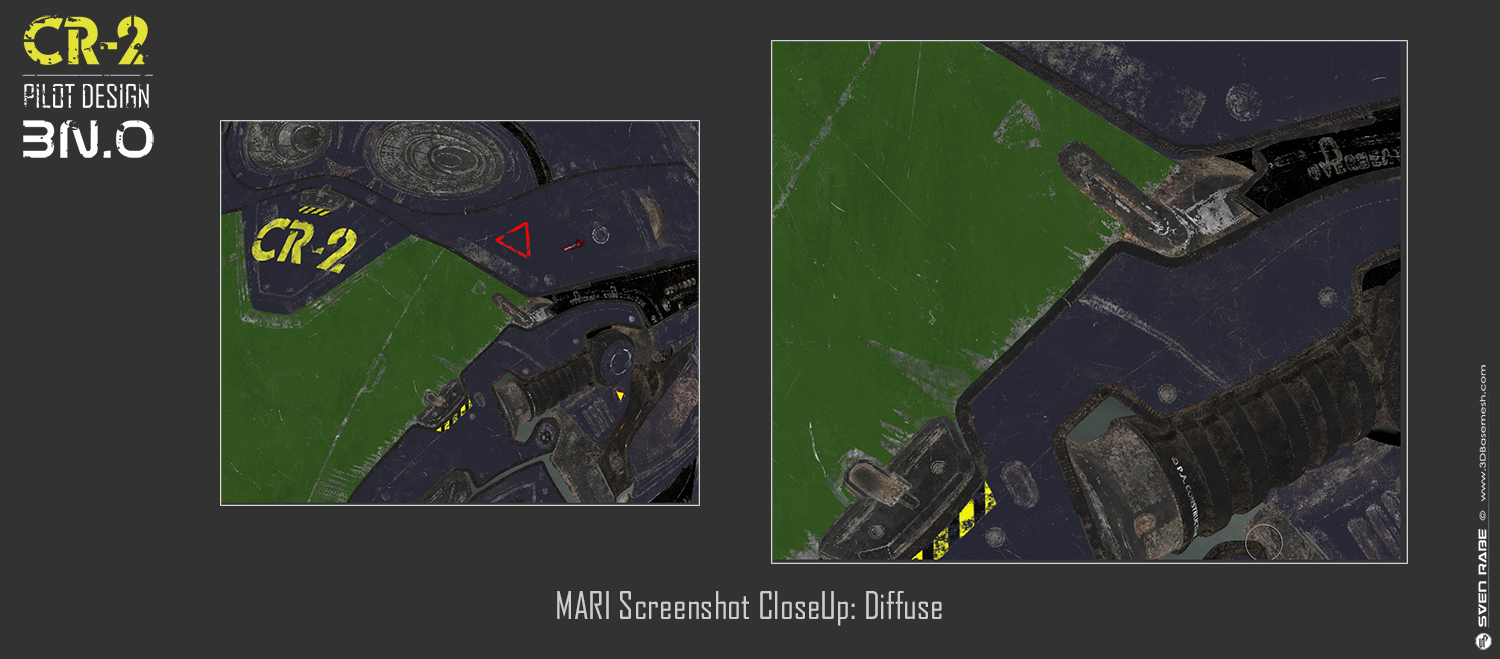
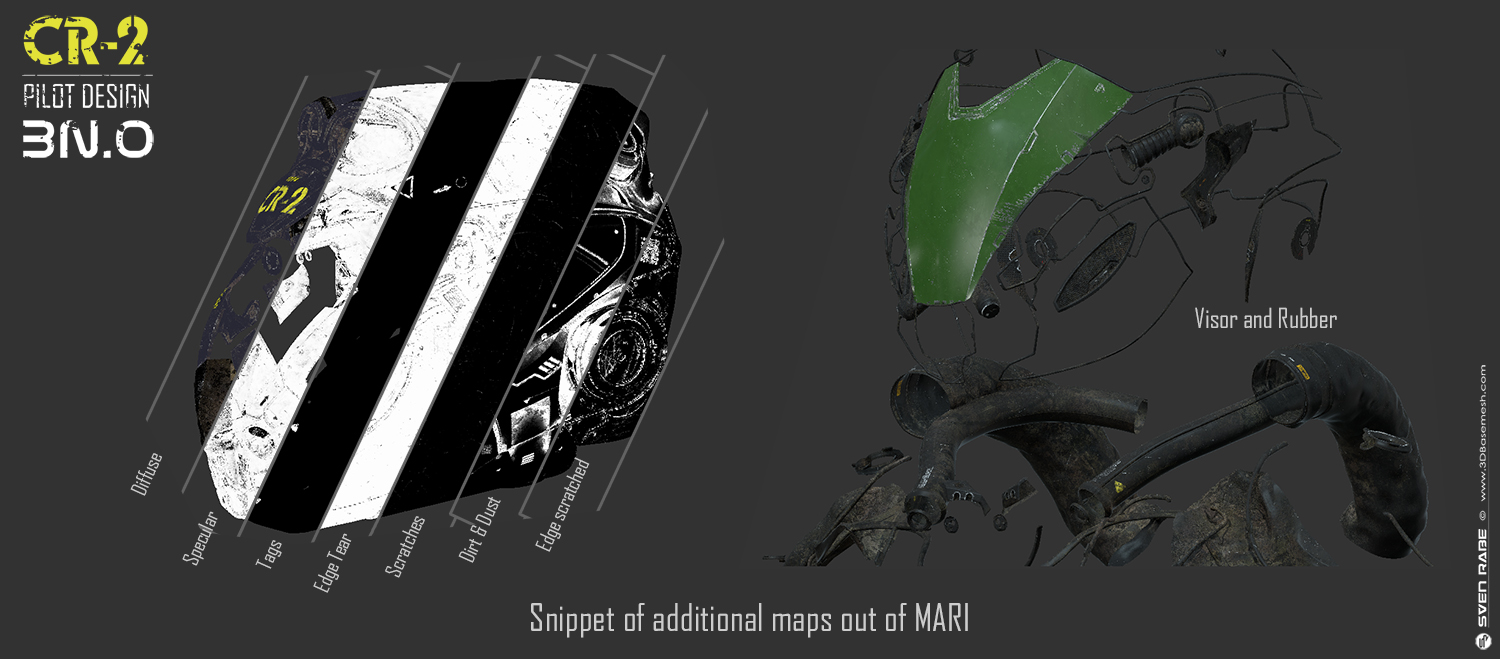
For hardsurface assets like this, I mostly start with the diffuse color by creating a diffuse channel and using some procedural color nodes in combination with masks to apply the base colors for the paint of the helmet. I try to think of texturing like modeling or painting, thinking from big to small, from blocking to detailing, from rough to fine. In reality nothing is perfect, so I always try to break up surfaces as much as possible. Therefor I also mixed some procedural noise layers into the base color for the coated paint, it’s very subtle but in the end, it’s one of many little elements which adds up to a more realistic look and feel. Next I started adding things like scratches, edge wear and tear, tags, signs, dust and dirt layers, by using various techniques like simple paint brushes, the ‘paint through’ brush or the procedural pattern node in combination with some textures. Also here I try to think of how this thing behaves and where scratches might appear due to the usage or where would dirt and dust deposit on these shapes. Depending on your shading pipeline, you can extract all those different maps separately to drive the shader network, which makes it much more flexible, but as this is a personal project, I tried to keep things simple and combined some of the maps. A great addition here to the MARI toolset is Jens Kafitz MARI EXTENSION PACK 3. It has a lot of extra nodes and in combination with baked ambient occlusion maps, cavity maps and curvature maps, it is very powerful. After the diffuse channel is established, I duplicate the whole channel and create additional maps like specular, bump, gloss etc. By sharing layers from the initial diffuse channel, the specular and bump channels get updated automatically, which is a great feature in MARI. Here you can see an example of the main layers for the paint diffuse map of the helmet: (Sorry for the bad GIF quality, but I hope you get the idea)
Main layers progress out of MARI for the diffuse paint channel
Some more screenshots out of MARI:
Snippet of additional maps I’ve created and used in MARI:
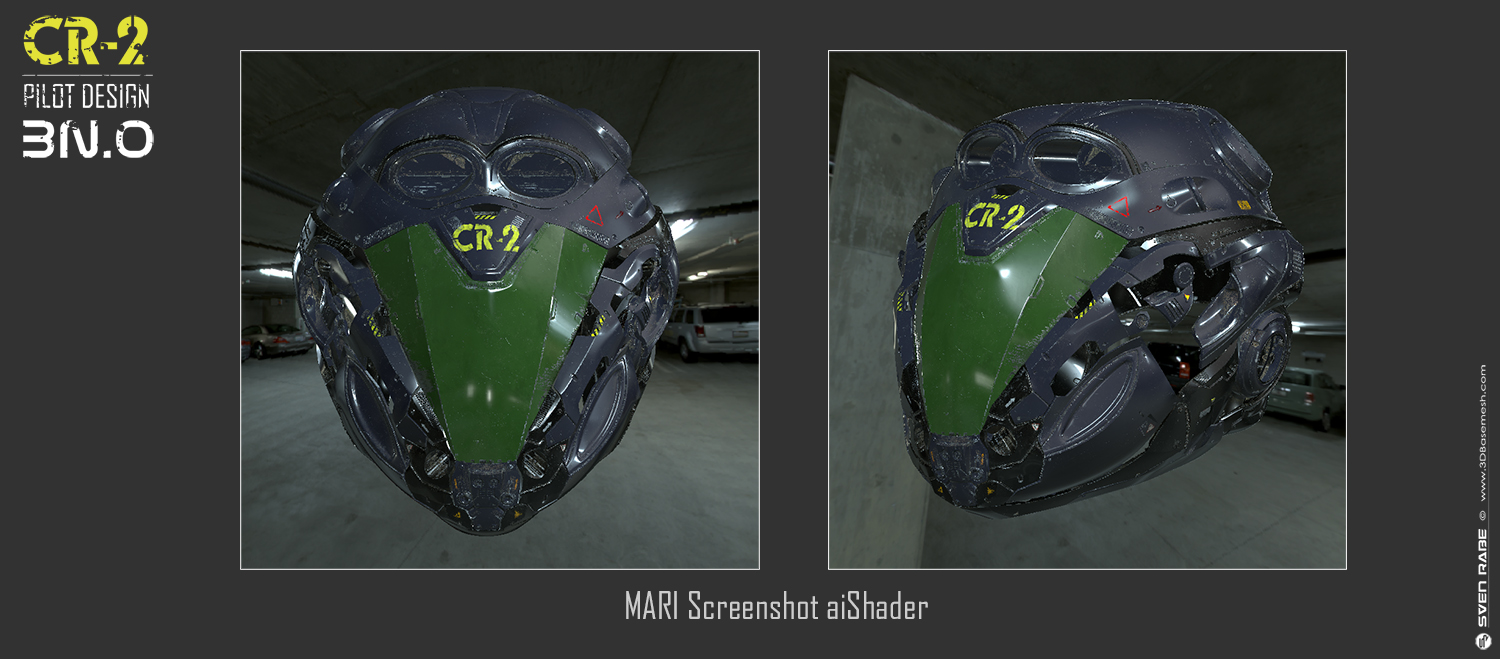
As I’m rendering mostly with Arnold, I like to use the aiShader within MARI, as you can reproduce your shader network to a certain point and this is very useful during the look development process:
Helmet screenshot out of MARI with the aiShader
Look Dev
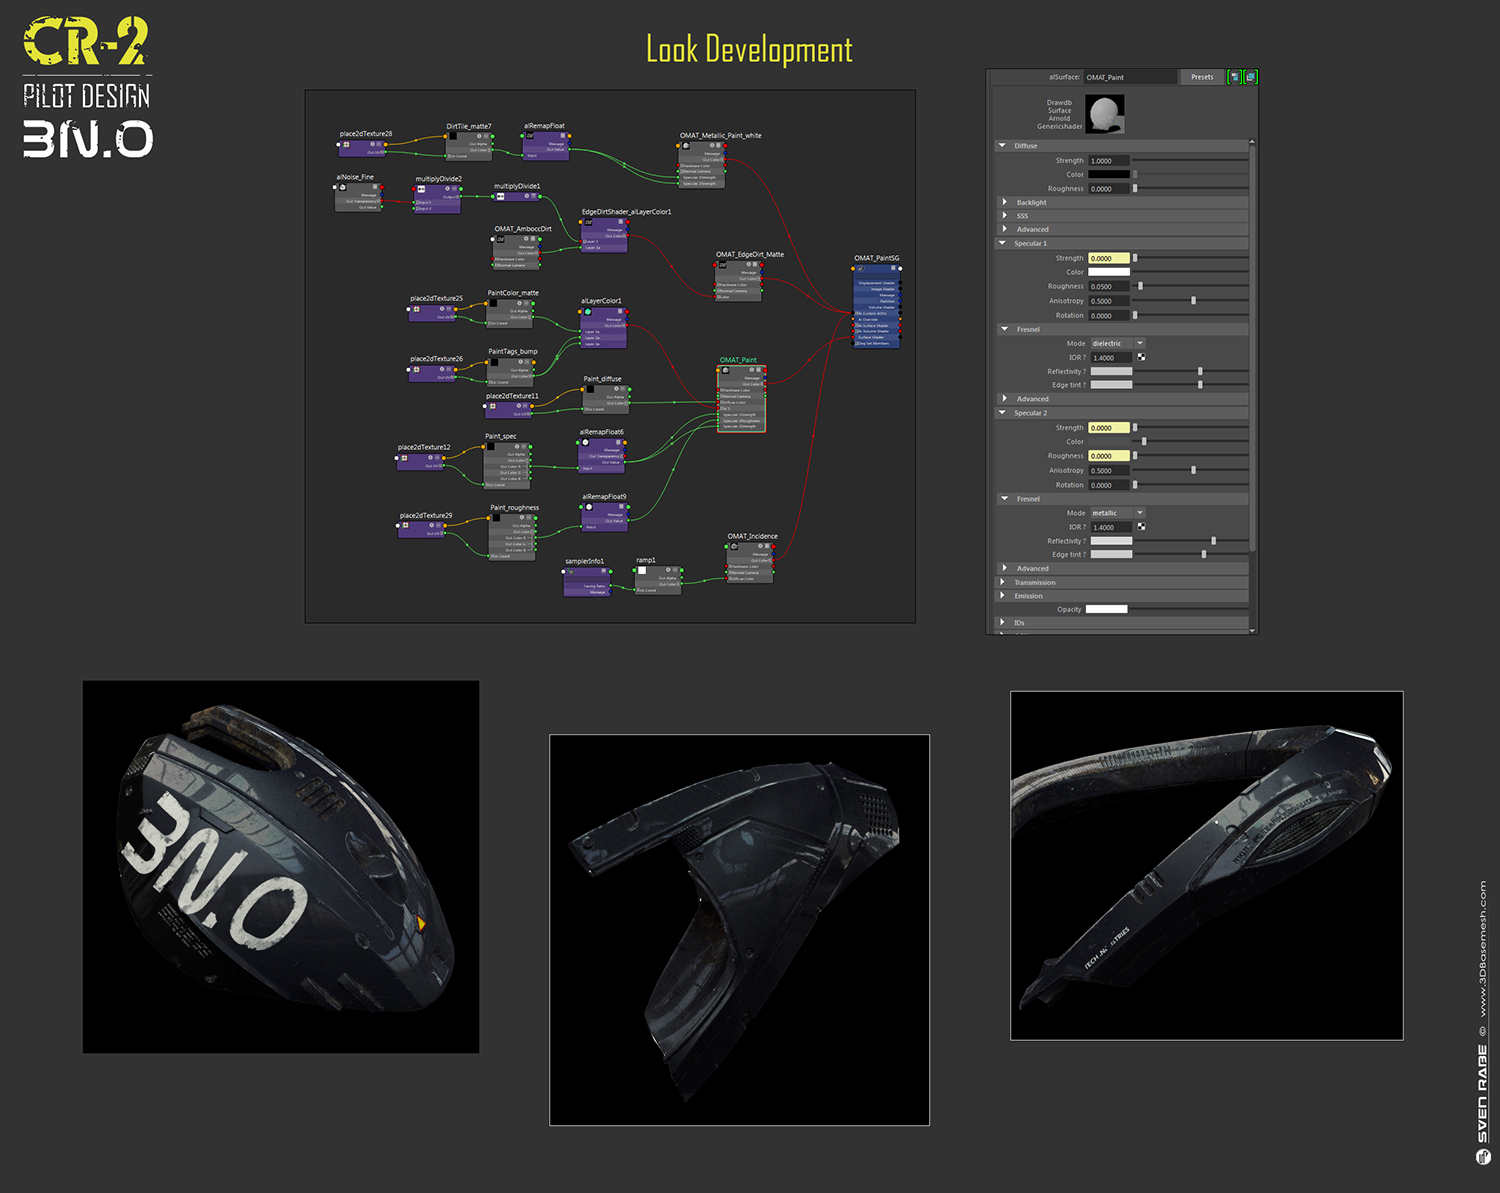
Before jumping into the shading and look development, I started to set up my Maya scene by bringing everything into proper scale. For this rather small scene I used 1 working unit = 1 cm. I also repositioned the pilot in the Y axis, so it would fit a full body persons height of around 6’1″. Next I grouped the head objects under a locator, so I could turn his head to get a more dynamic pose. At this stage I’m also testing various camera angles and different lenses, to get a feel for the shot. I ended up with 4 different camera angles. When starting the lookdev process in Arnold, I mostly start with the alSurface shader, which is part of a shader collection by Anders Langlands. It is used by many production studios nowadays when working with Arnold, as it offers more flexibility and also some optimizations that can dramatically decrease render times. Here you can see the settings I’ve used for the main material, the coated paint, as well as the shader network where I’ve also added some additional custom AOVs (framebuffer) for later use in the compositing stage:
Maya shader network and settings for the coated paint material
Lighting and Rendering
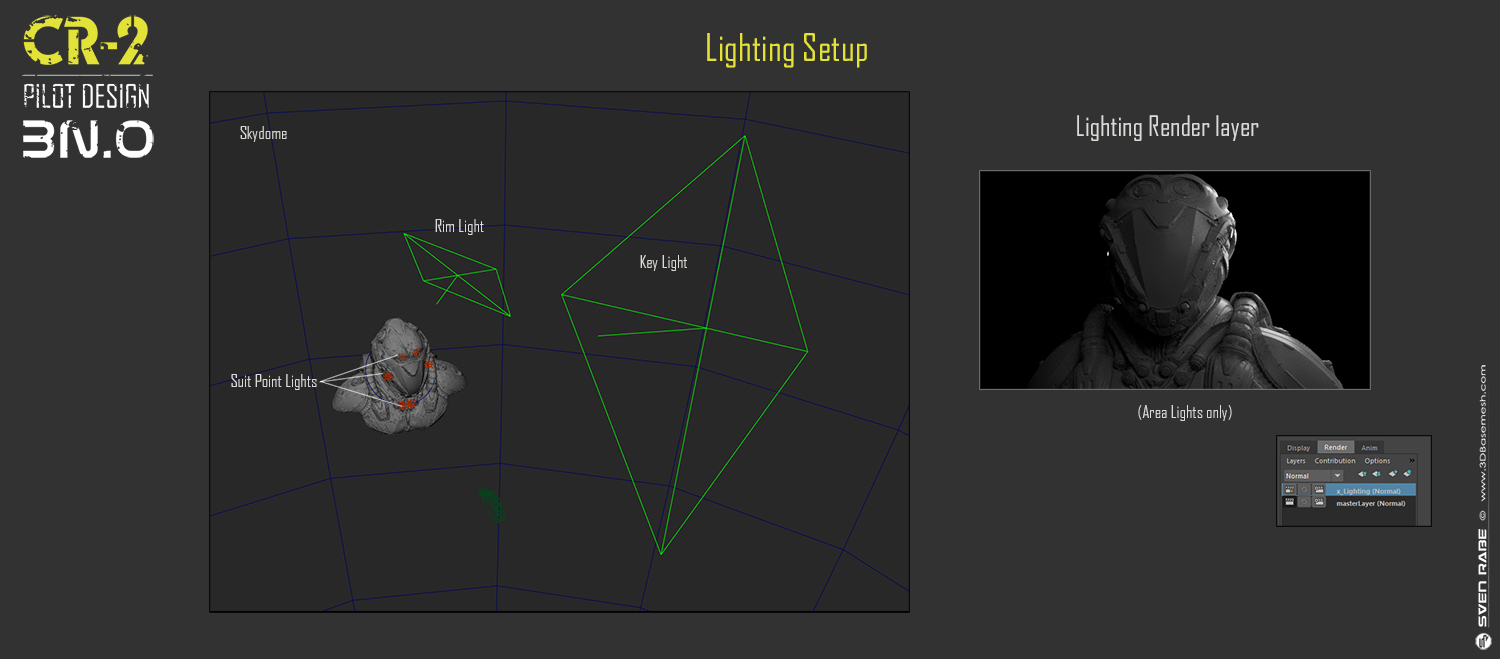
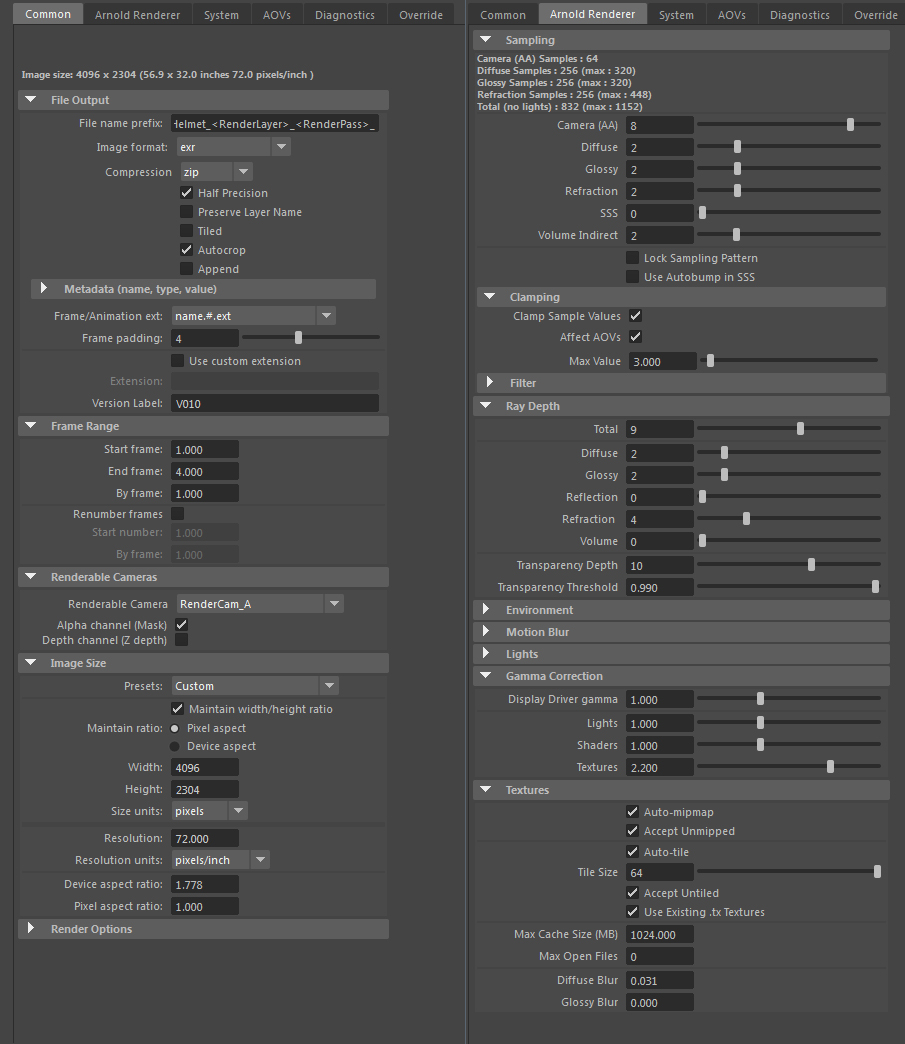
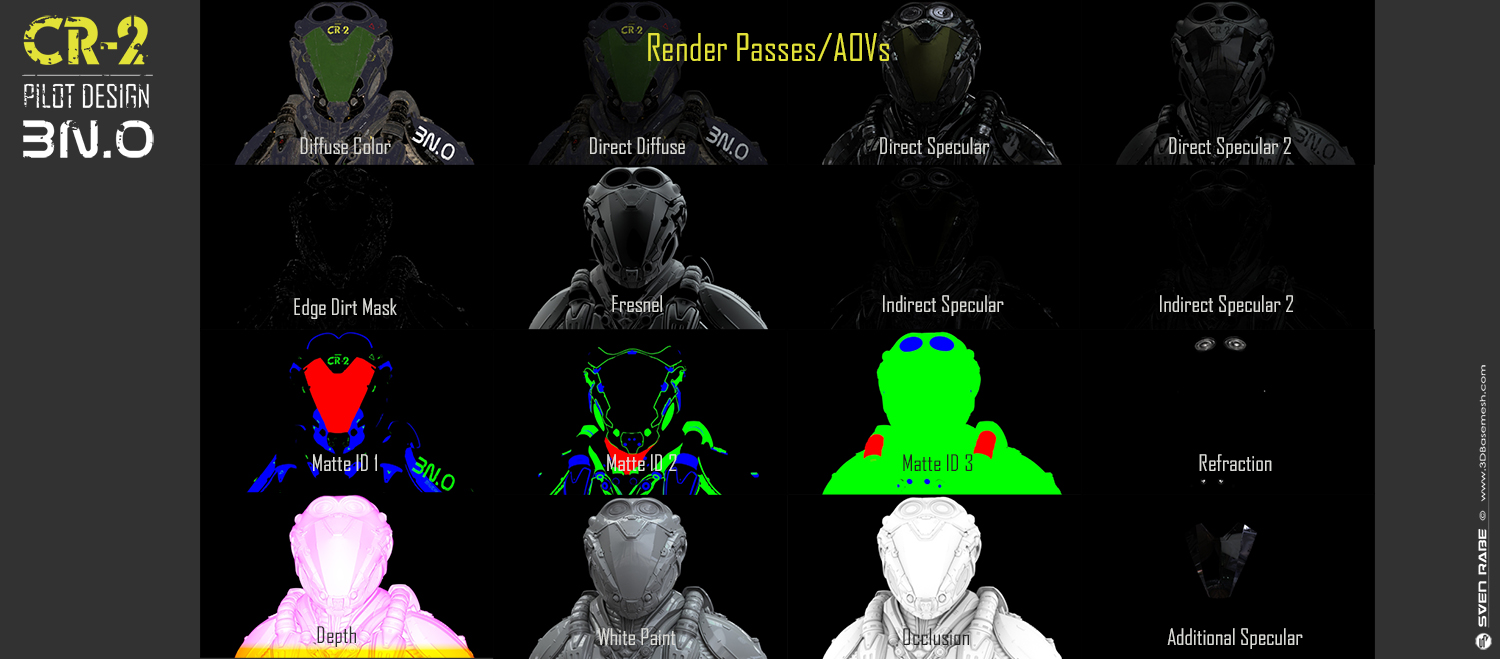
For the lighting I like to create an extra render layer with a grey material as override. This render layer is not for the final rendering, it just helps to speed up render times during the setup and also you can focus more on the lighting itself. For this scene I just used 2 Area Lights with HDR images plugged into it (key and rim light), as well as a skydome light with also a HDR image connected, to get some nice reflections and bounce light from the environment. As mentioned at the beginning of this breakdown, I had a certain mood in mind and therefore I had to assure, that my background image and the 3D lights are matching, so the viewer can easily visualize where the light is coming from. In this case, it wasn’t too hard, because most of the materials were glossy and it was night, so it’s more about the reflections rather than the direct and indirect diffuse. I my mind, there was a lot of light coming from behind as this guy is surrounded by this big hangar or airbase, so I needed a backplate that complies to this purpose. Below you can see some screenshots of the light setup, my render settings and the AOV’s I’ve rendered for the final render output in 4K:
Maya Lighting Setup
Arnold Render Settings
Arnold AOVs / Render Passes
Compositing
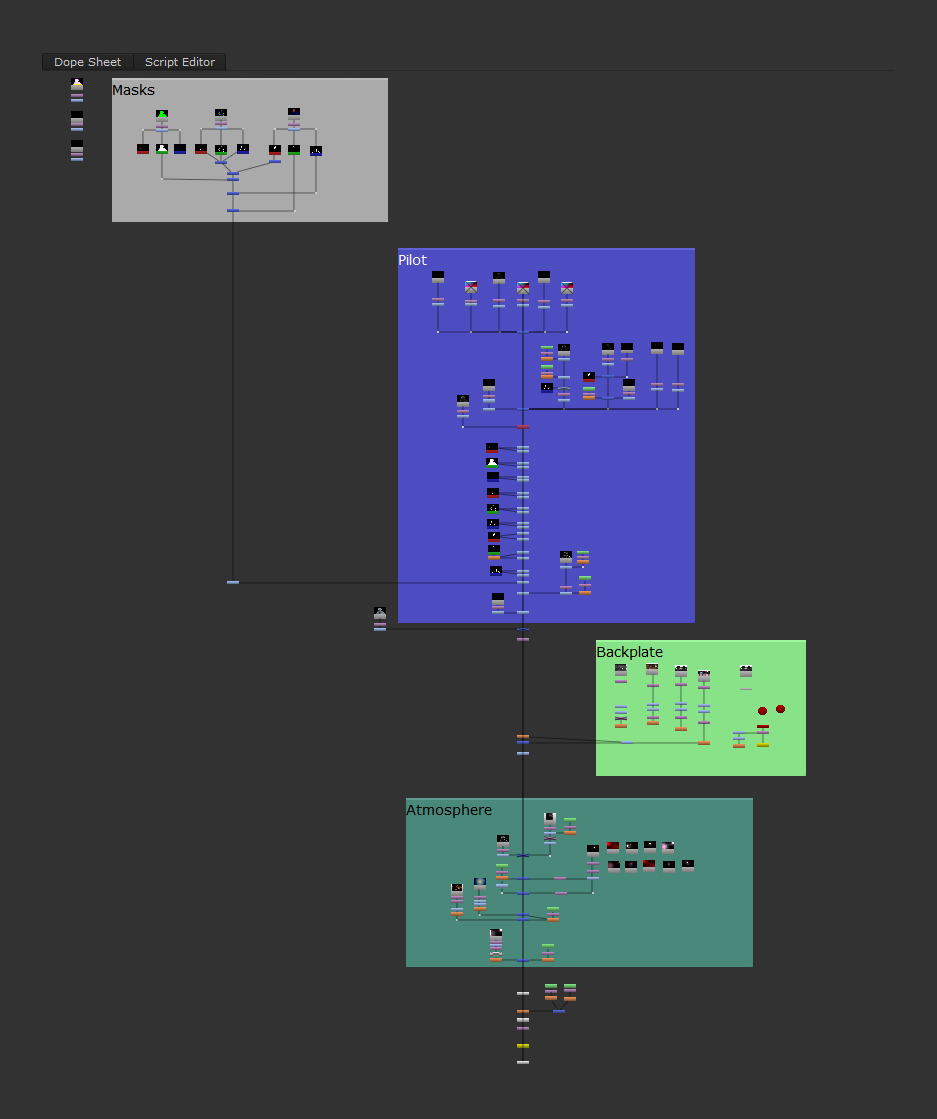
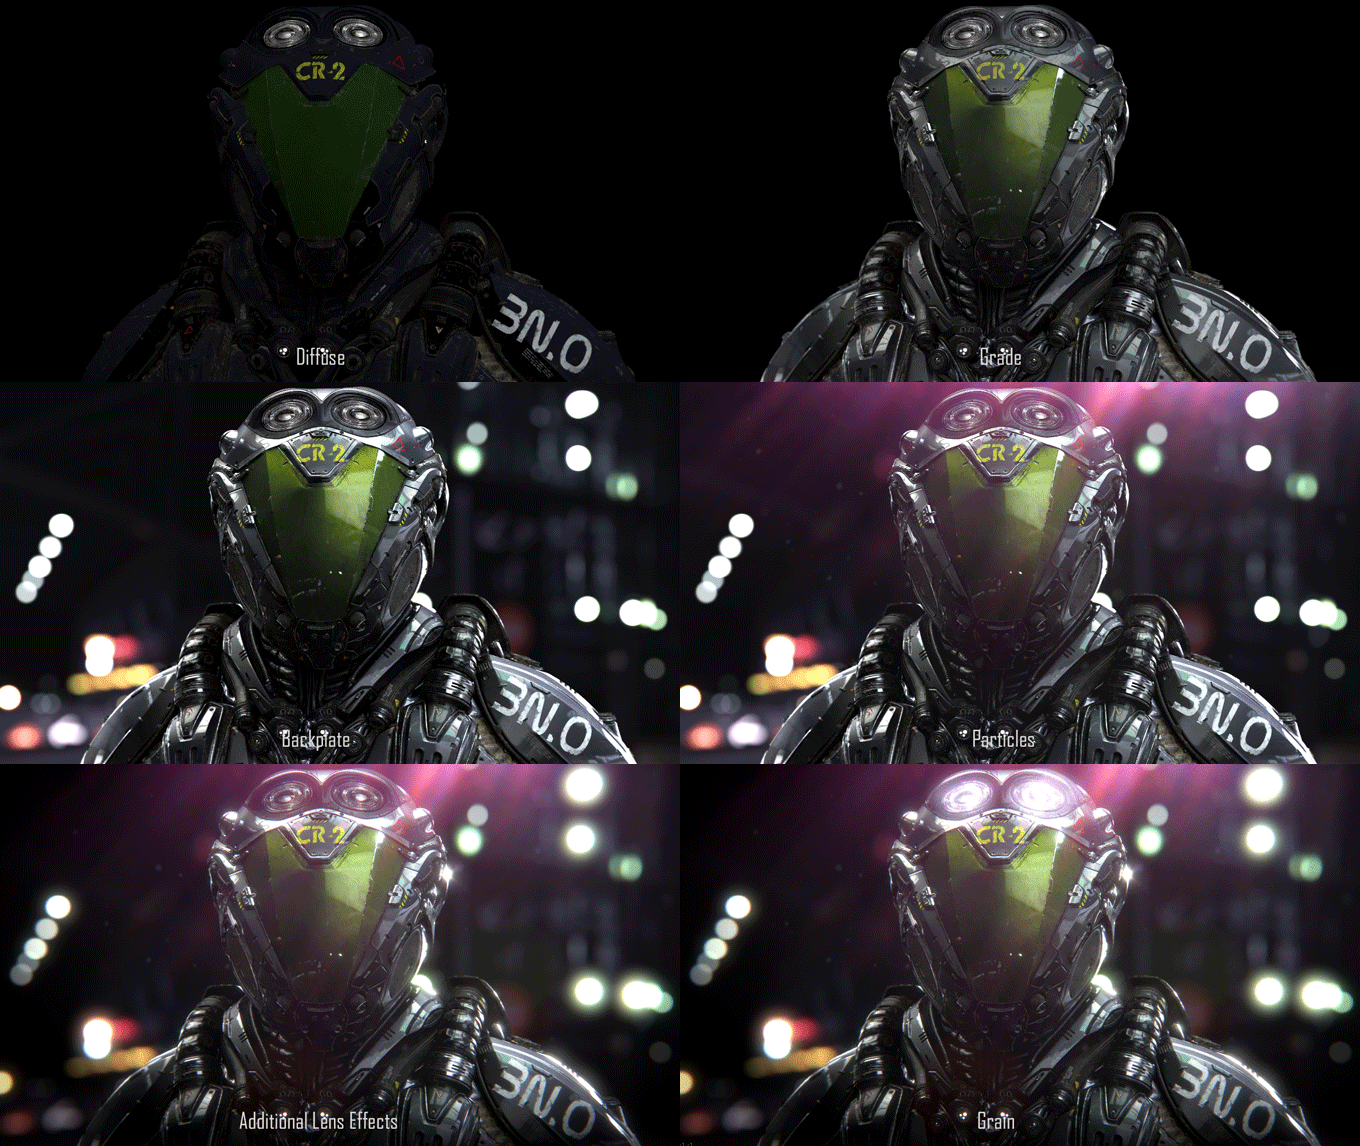
I used NUKE for the compositing, as I like to work in a non-destructive way. This is very handy, especially when you’re working with an image sequence like here (4 camera angles = 4 frames) and you re-render passes or you want to update to a new version, it’s just one click. The NUKE script for this project is fairly simple. I splitted it into 4 sections to keep things organized: masks, pilot (foreground), backplate (environment) and atmosphere. To have more control over the environment, I exported the camera via FBX from Maya to NUKE and added a 3D environment sphere to the NUKE scene. As a result I was able to turn the right detail of the background directly into place within NUKE and keyed the transformations for each frame. Here you can see a screenshot of the NUKE script and a progress gif:
Nuke script
Comp progress
Final Retouch
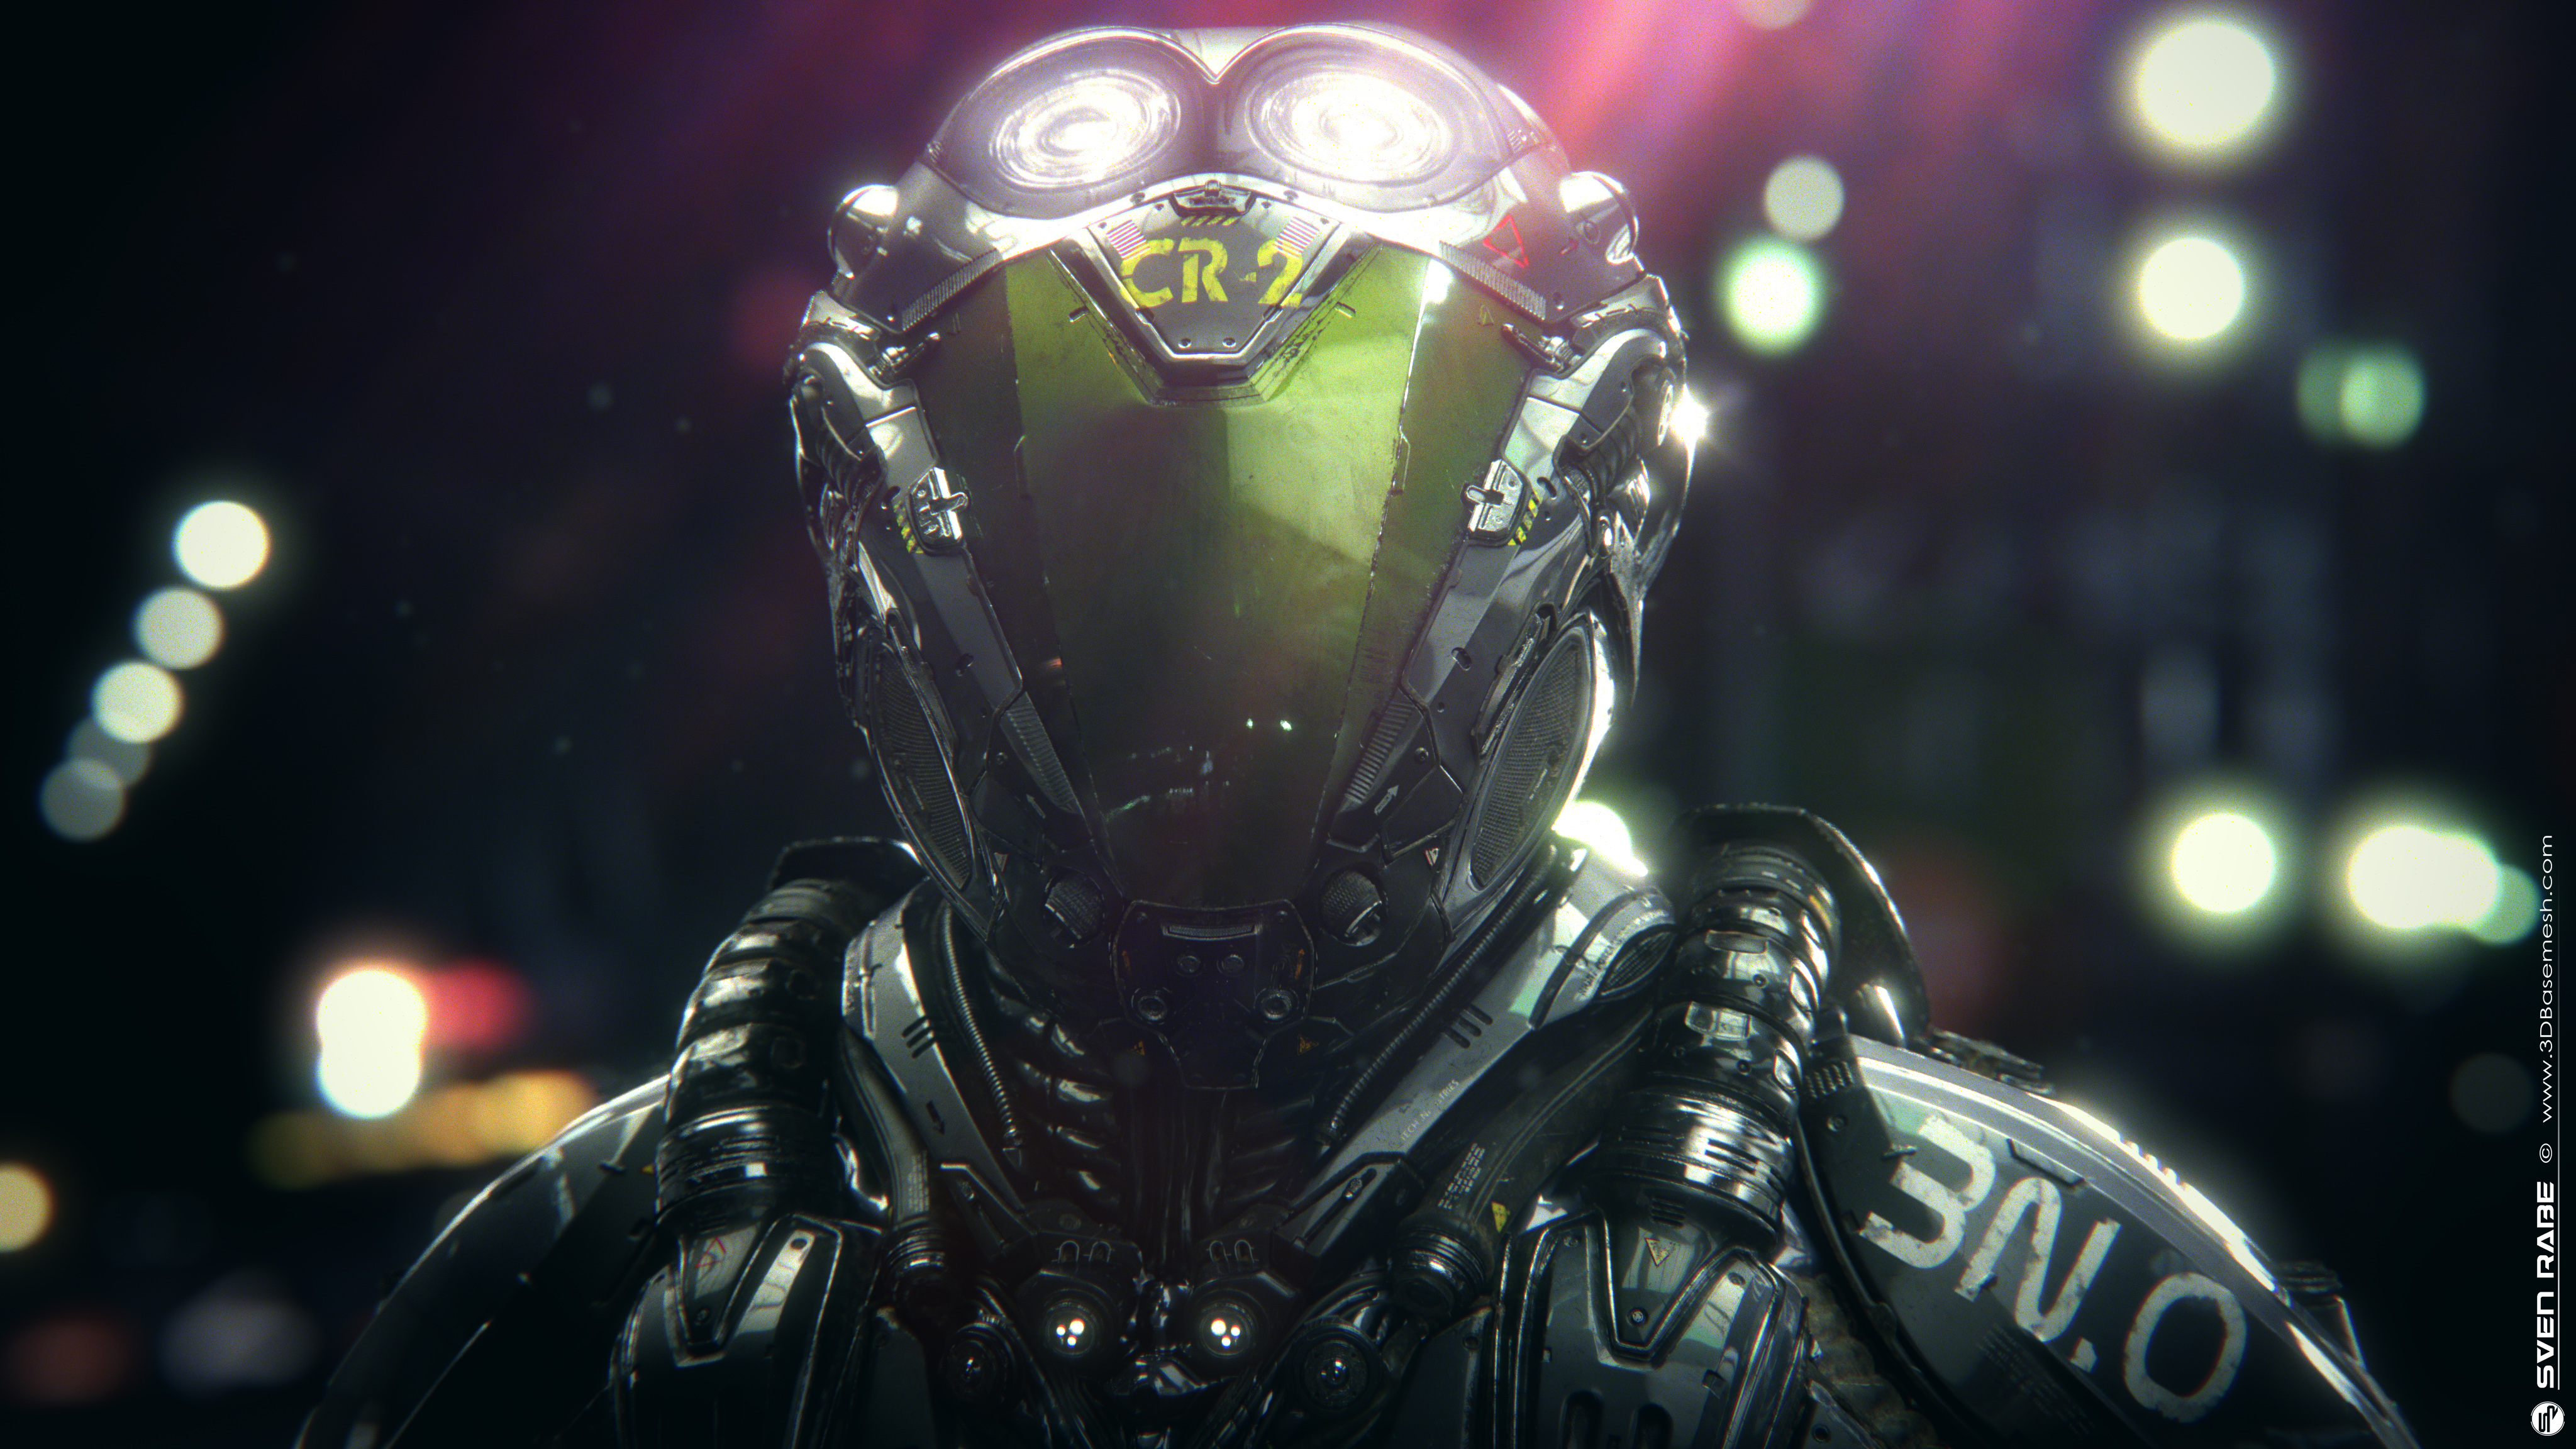
In the final step I took all 4 images into Photoshop for some mini adjustments here and there. It’s basically like a final beauty retouch step, although the differences are barely visible. Technically this could also be done in NUKE, it’s just a personal preferences to use Photoshop here for the finish. To wrap this whole thing up, here are the final images of 2 of the shots:
CR-2 Final Shot – Front
CR-2 Final Shot – Side
Conclusion
I had a lot of fun with this project and I really hope that this breakdown was helpful in some way. Thanks a lot for reading and I hope you enjoyed it!

